For step-by-step instructions on how to take a test in the YoutestMe GetCertified application, please watch the video below.
This page will explain test-taking process from a student’s perspective.
Accessing a test
All tests assigned to a specific student are available in the student’s My assignments tab. For more information on available options within this tab, please visit the Assignments help page.
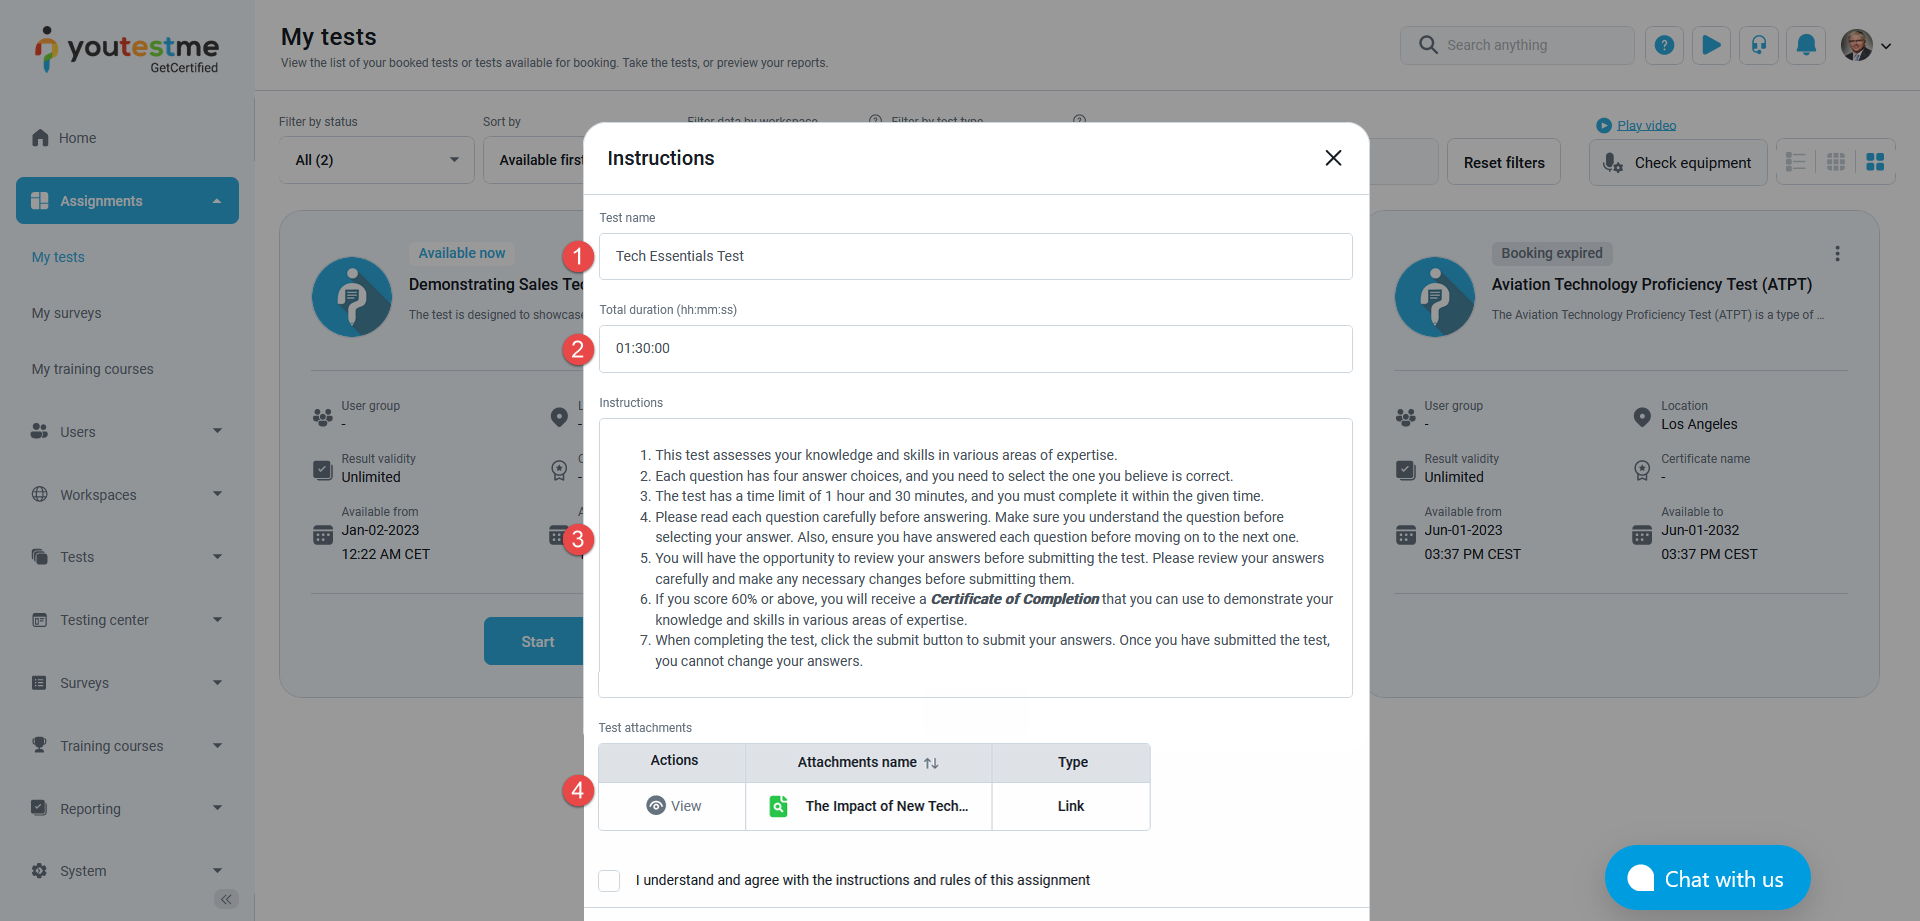
Before starting the test, agreeing with the given instructions is necessary. You should:
- Select a checkbox to agree with the instructions and rules.
- Click the Start button.

- This pop-up window also contains other information related to the test-taking process, such as:
- Test name – The name of the test you will start.
- Total duration – Total time available for completing the test.
- Instructions – Important rules, instructions, or notes must be acknowledged before starting the test.
- Attachments – Test attachments. Attachments may be accessible only on this page (before test-taking) or throughout the test. You can preview all of them here.
When initiating a test, additional fields and pop-ups may appear if the following options are enabled during the test creation:
The testing session is locked – When a testing session is locked, you need to enter a password to start the test. The field for entering the password is in the same window with the test name, duration, and instructions.
The test instructor should provide you with a password for unlocking the test. If you have not received the password, contact your instructor.
If the test has two self-enrollment sessions created, a candidate can choose one of the testing sessions offered before taking the test.
To select one of the self-enrollment sessions, follow these steps:
- Click the Choose the session button – A pop-up window will appear, allowing you to select the desired self-enrollment test session.

- Click the Book button.


Note: After booking one of the self-enrollment testing sessions, the Start button will appear, enabling you to begin the test. It is possible to select only one self-enrollment session for one test attempt.
If the Enable browser lockdown option is checked, a window will appear informing you that:
During the test attempt, the following options are disabled:
- The right-click (pressing down the right mouse button)
- Cutting with shortcut
- Copying with shortcut
- Pasting with shortcut
During the test attempt, the following options are forbidden and will lead to exam termination:
- Using the print screen key
- Closing the full-screen mode
- Using the function keys at the top of the keyboard
- Using the Esc key
- Using the Windows key
- Changing the focus to another screen
To start the test, you should click the Continue button.

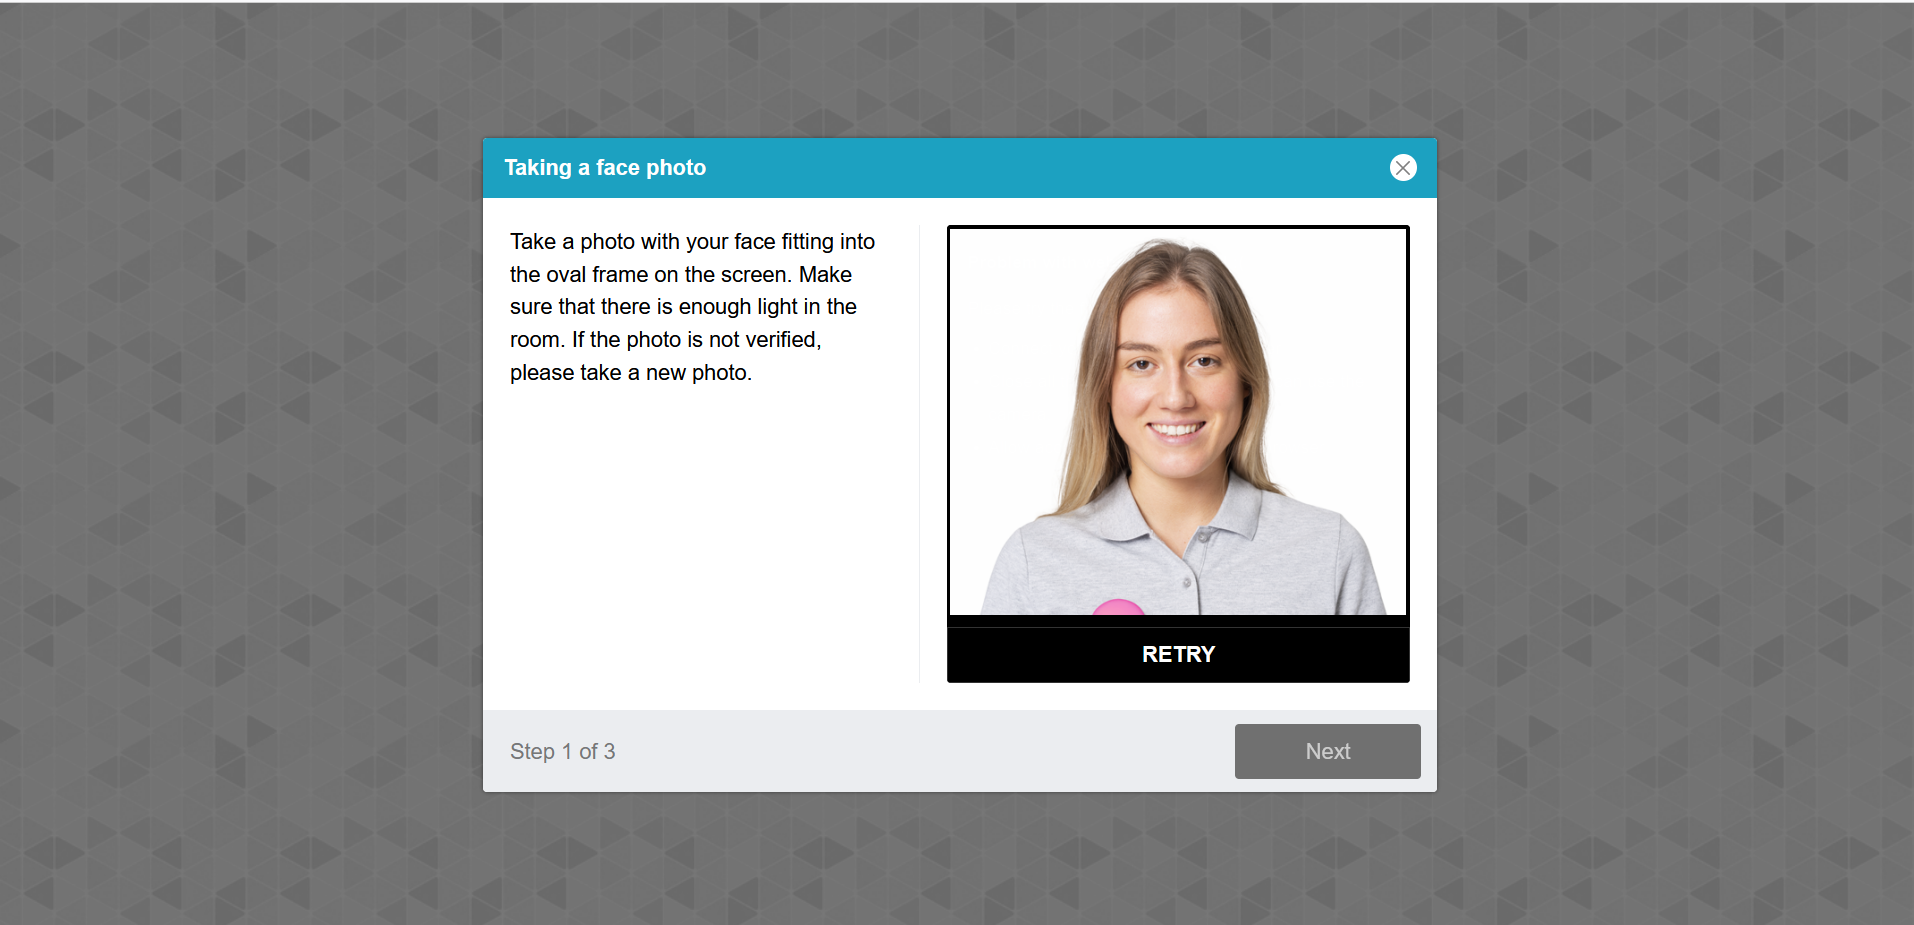
Proctoring mode is enabled – Once you accept the test instructions, a pop-up for equipment check will appear. The system will check if the browser is in full-screen mode and whether the microphone, camera, and internet connection are available and functioning properly.
Note: You should allow the use of a camera, microphone, and screen share in case this pop-up appears.

In the following step, the system will take your picture to compare it to the person in front of the camera during the test and validate your test attempt.
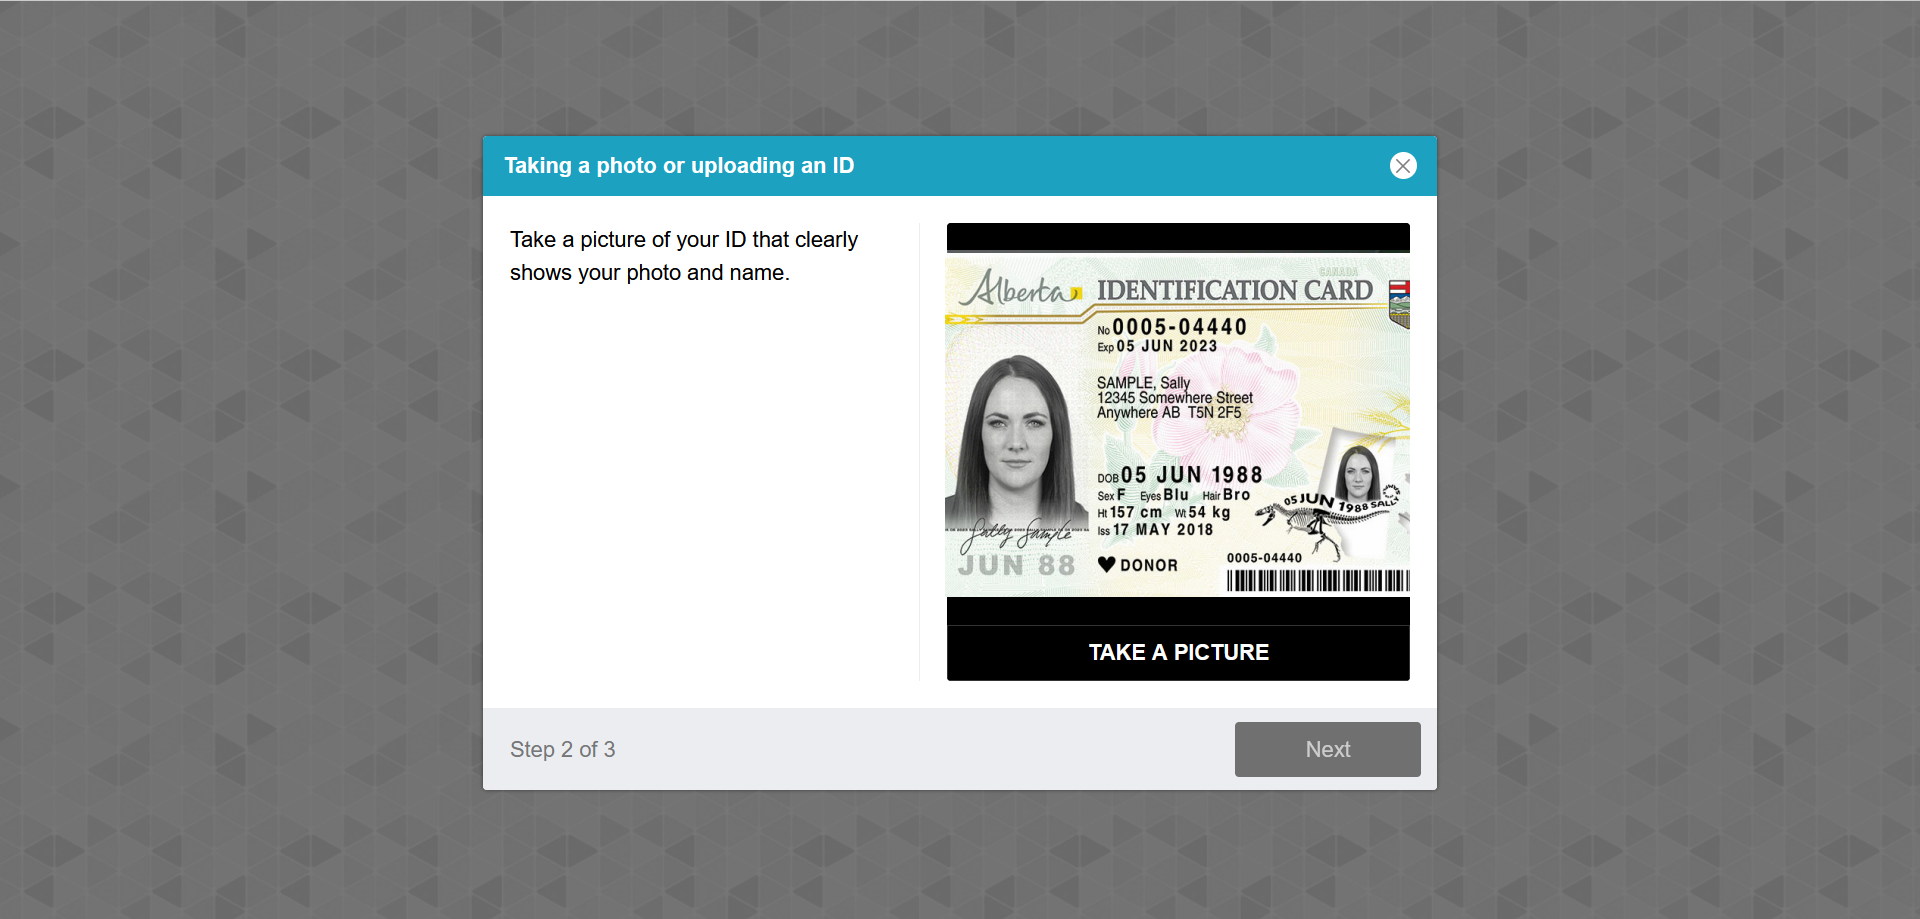
Next, you will be asked to take a picture of your ID document to confirm that you are the person who is doing the test.
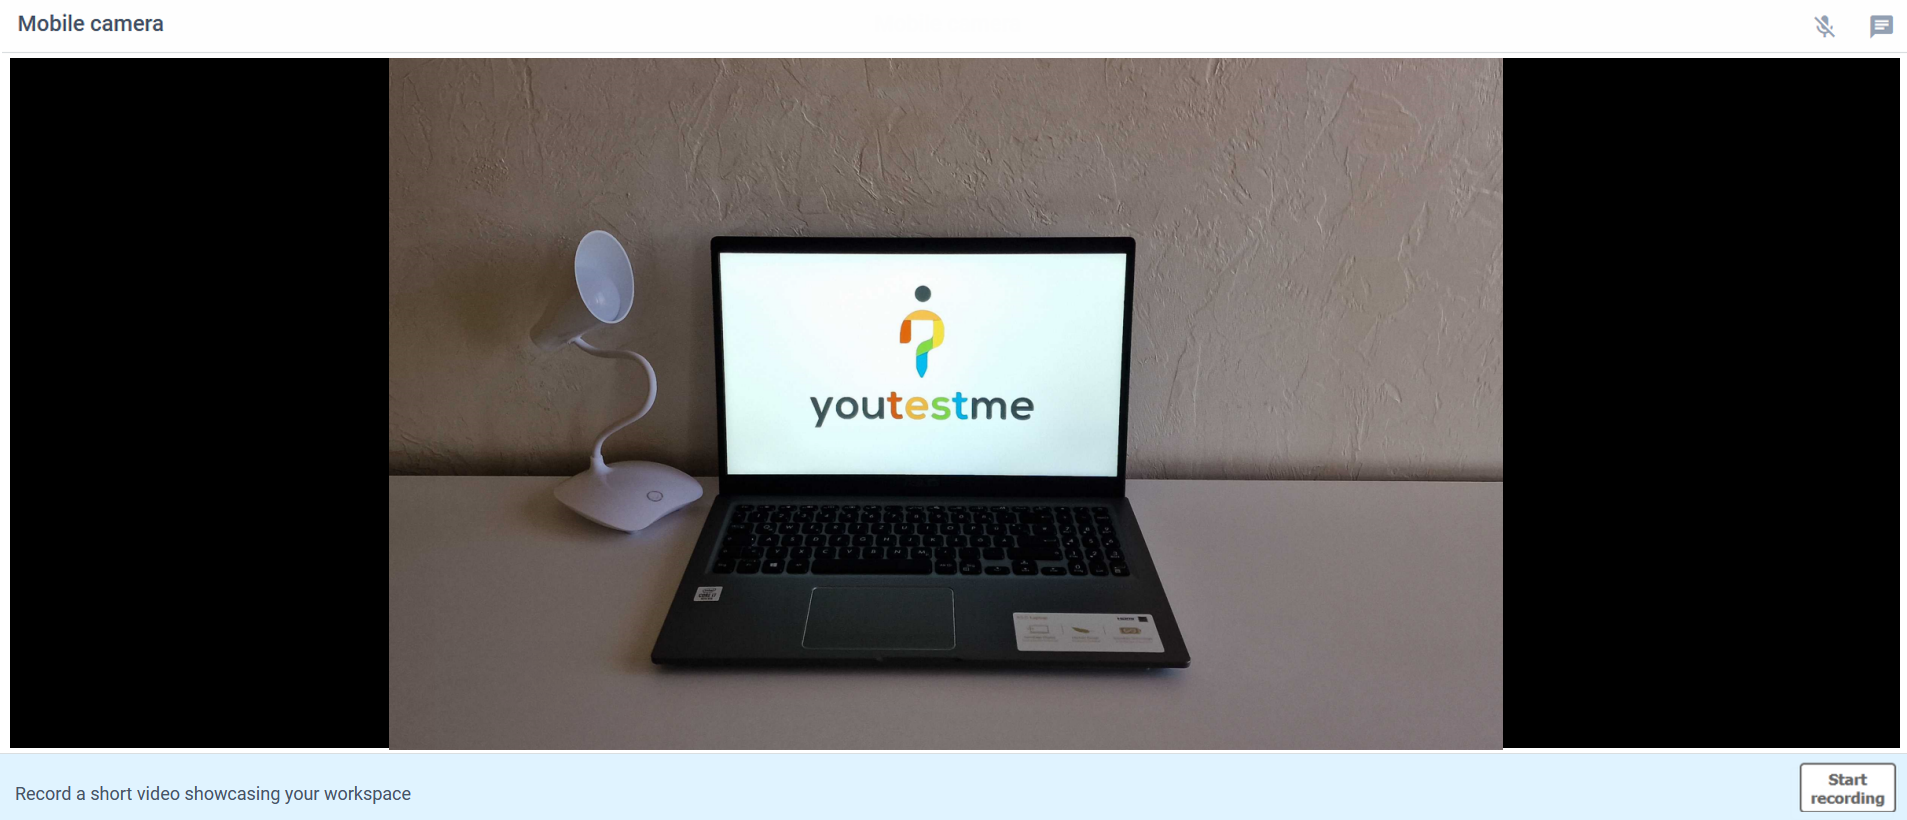
You will be required to scan your environment with a camera. Scan the code that appears on the screen to access the link where you can record your surroundings.
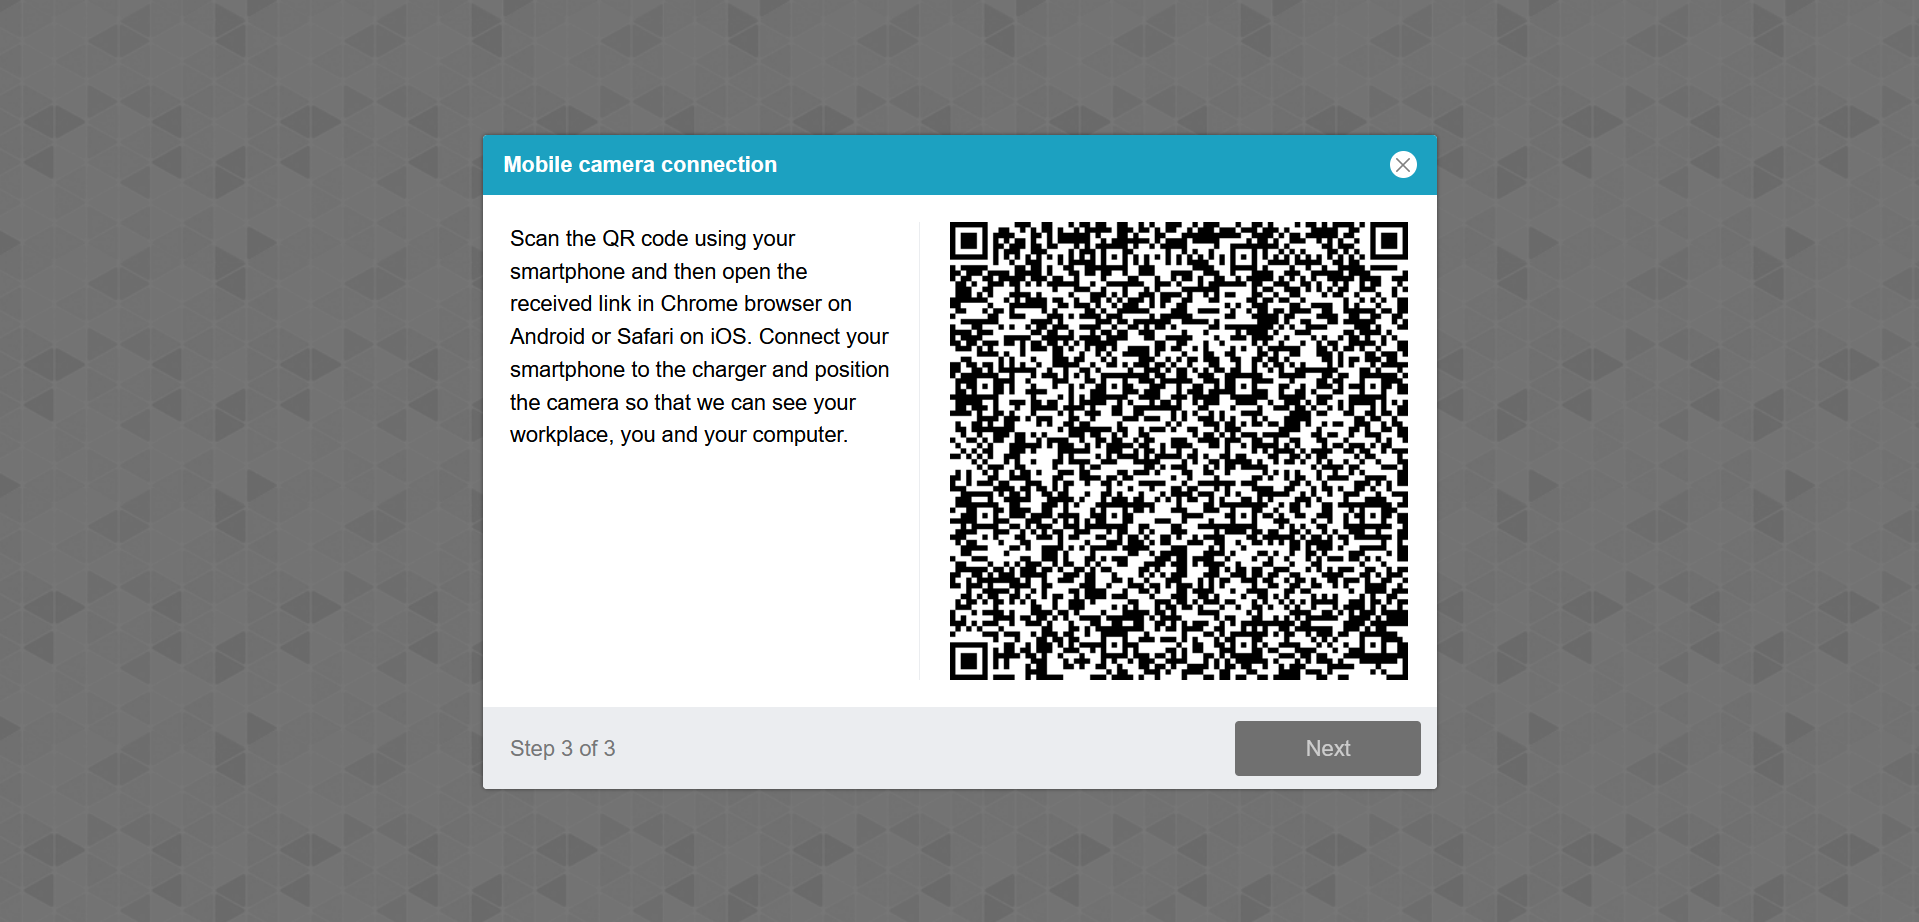
Note: Depending on your exam configuration, some of these options may not be required.
- The test has one or more sections – If a test has one or more sections, a window with the following information will appear at the beginning of each section:
- Section name – The name of the test section you will start.
- Total duration – Available time for completing the test section.
- Instructions – Important rules, instructions, or notes must be acknowledged before starting the test.
- Section table – Information about sections, their availability period, and when the section started and finished. If a section is available to start or continue, you can access it by clicking on section name it this table.
- Action buttons
- Start section – If you haven’t started the section yet, you can click on this button to start the section. If the section has expired in the meantime, this button will be disabled.
- Continue section – If you’ve already started the section and left the test, you can click on this button to continue where you left off. If the section has expired in the meantime, this button will be disabled.
- Next section – If you’ve already started the section and left the test, and the section has expired in the meantime, you can click on this button to be redirected to the next available section.
- Exit the test and continue it later – Exit the test and return later to seamlessly continue from where you left off, preserving your work and answers.
- Finish test – If there are no available sections you can access, you can just click this button to complete the test.
-
Refresh – If the section wasn’t available when you accessed the section summary screen, click on this button to refresh the page and start/continue the section.
For more information on test sections, please visit this article.
To start the section, click the Start section button.

Require updating profile information is enabled – A pop-up for updating your personal information will appear when you accept the test instructions. Here, you can:
-
Continue without changes – If you have not made any changes, click this button.

-
Save and continue – This button will appear after the information changes. Click it to save the changes and start the test.
-
Cancel – This button will appear after the information has been changed. Click it to discard the changes you have made. To start the test, you should also click the Continue without changes button.


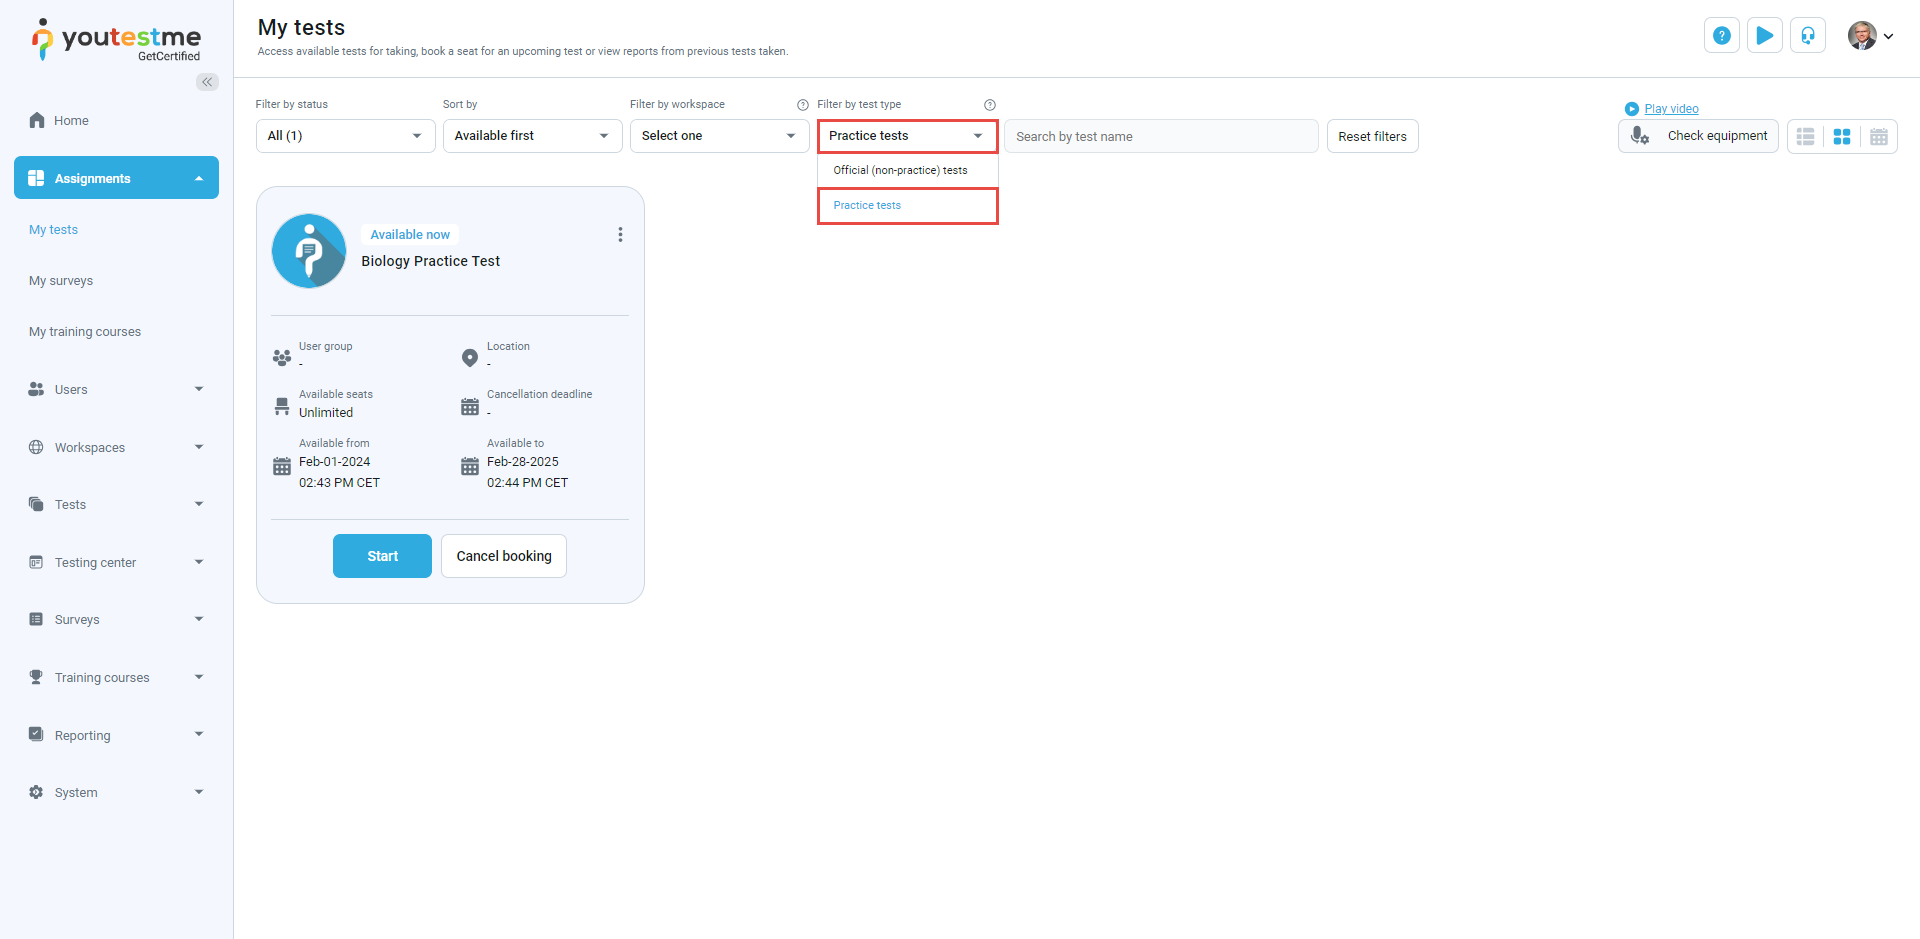
Practice test
If the Practice test option is enabled, you can use practice tests to prepare for the official test. On the Assignments page, filter the test type to practice tests.
To generate a practice test, click the Start button. A window for customizing the number of questions for each pool in the test will appear.
You have the following options:
Edit the number of questions for each existing pool.
Include all questions by checking the checkbox in the Include all questions column.
Generate – This button creates an attempt with a set number of questions. After selecting it, the Instructions dialog will appear.

Test-taking platform
This help section will explain the most important options and information for test-taking.
General options
- The name of the test.
- Ordinal number of the question and the total number of questions.
- Type of question – Specifies whether a question is a single choice, multiple choice, essay, ordering, fill in the blanks, true/false, matching, matrix, open-ended, or hot-spot question.
- The number of points you earn when you answer the question correctly.
- The number of negative points you earn when you answer the question incorrectly.
- The difficulty level of the question – Easy, medium, or difficult.
- By clicking this button, you will see the test/section instructions.
- The calculator feature.
- By clicking this button you will flag the question. You can see your review list at any time on the right panel before finishing the test.
- Question text.
- Notes for the test.

Main buttons
- Previous question – Return to the previous question. This button will be displayed only if the option is allowed during the test creation.
- Next question – Move on to the next question.
- Upload file – Answer the question with a picture, table, diagram, etc.
- I will not answer this question to avoid possible negative points – Skip the question and avoid earning possible negative points.
- Feedback for this question button – Define question’s difficulty and provide your feedback.
- Continue later – Pause the test. You can continue later until test is still available. All answered answers will be saved.
- Finish section – This button is displayed only if the test has multiple sections.
- Finish test – Complete the test.

Progress bar
- The bar visually represents how many questions were answered out of the total number of questions (in a section or entire test).
- The symbols and colors specify the status of each question:
- White field – Question is not answered.
- Yellow field – Question is skipped because the I don’t know option was selected.
- Blue field – Question is answered.
Note: If the “Real-time grading” option is enabled, the field will be blue when the instructor must rate the question. - Green field – The question is answered correctly. This color is used only when the “Real-time grading” option is enabled.
- Red field – The question was answered incorrectly. This color is used only when the “Real-time grading” option is enabled.

Test timing
Depending on the test settings, you may have:
-
Unlimited time to answer questions. In that case, the test does not contain a timer.

-
The time limit for completing the entire test

-
The time limit for completing each section.

-
The time limit for answering each question.


Hints
Depending on the test options and the type of question, you can use the following forms of assistance:
- Hint – Additional text that will help you answer the question.
- Minus one wrong answer – One wrong answer will be removed.

Note: Using assistance will change the number of points you have earned if they carry penalty points:
If you use assistance and answer the question correctly, the total number of points you have achieved will be reduced by the assistance penalty points.
Attachments
Attachments can be added to questions, sections, and/or tests. Next to each attachment, there is a preview option called View.

By clicking on the View icon, the attachment will open in a pop-up window.

Note: In browser lockdown mode, only the picture, text, and video attachments (videos that can be played while test-taking) are supported. Link attachments are disabled.

Notes
The Notes section contains a list of all the candidates’ annotations made throughout the test, accessible solely when authorized by the instructor. Available actions related to notes include:
- Filter notes by section or question ordinal number.
- Edit and preview the note in a new dialog.
- Delete the selected note.
- Create new – Add a new note to a question.

Note: Notes have to be enabled in test settings.

Feedback
The candidate can provide feedback by selecting the appropriate difficulty level for the question and/or leaving a comment. Their feedback will be saved and visible to the test manager.

Note: Feedback has to be enabled in test settings.

Finishing the test
After clicking the button to complete the test, a window may appear:
-
To inform you that you have unanswered questions and questions you have skipped in the test/section.
Click the Yes button to finish the test regardless of the unanswered questions or the No button to return to the questions.

-
To inform you that you have unanswered questions. Click the Close button to answer the remaining questions.
Note: This will happen if the option that requires answering all questions is enabled during test creation.

-
To ask you if you are sure you want to finish the test. If you are certain click the Yes button or if you want to check your answers again, click the No button to return to the test.


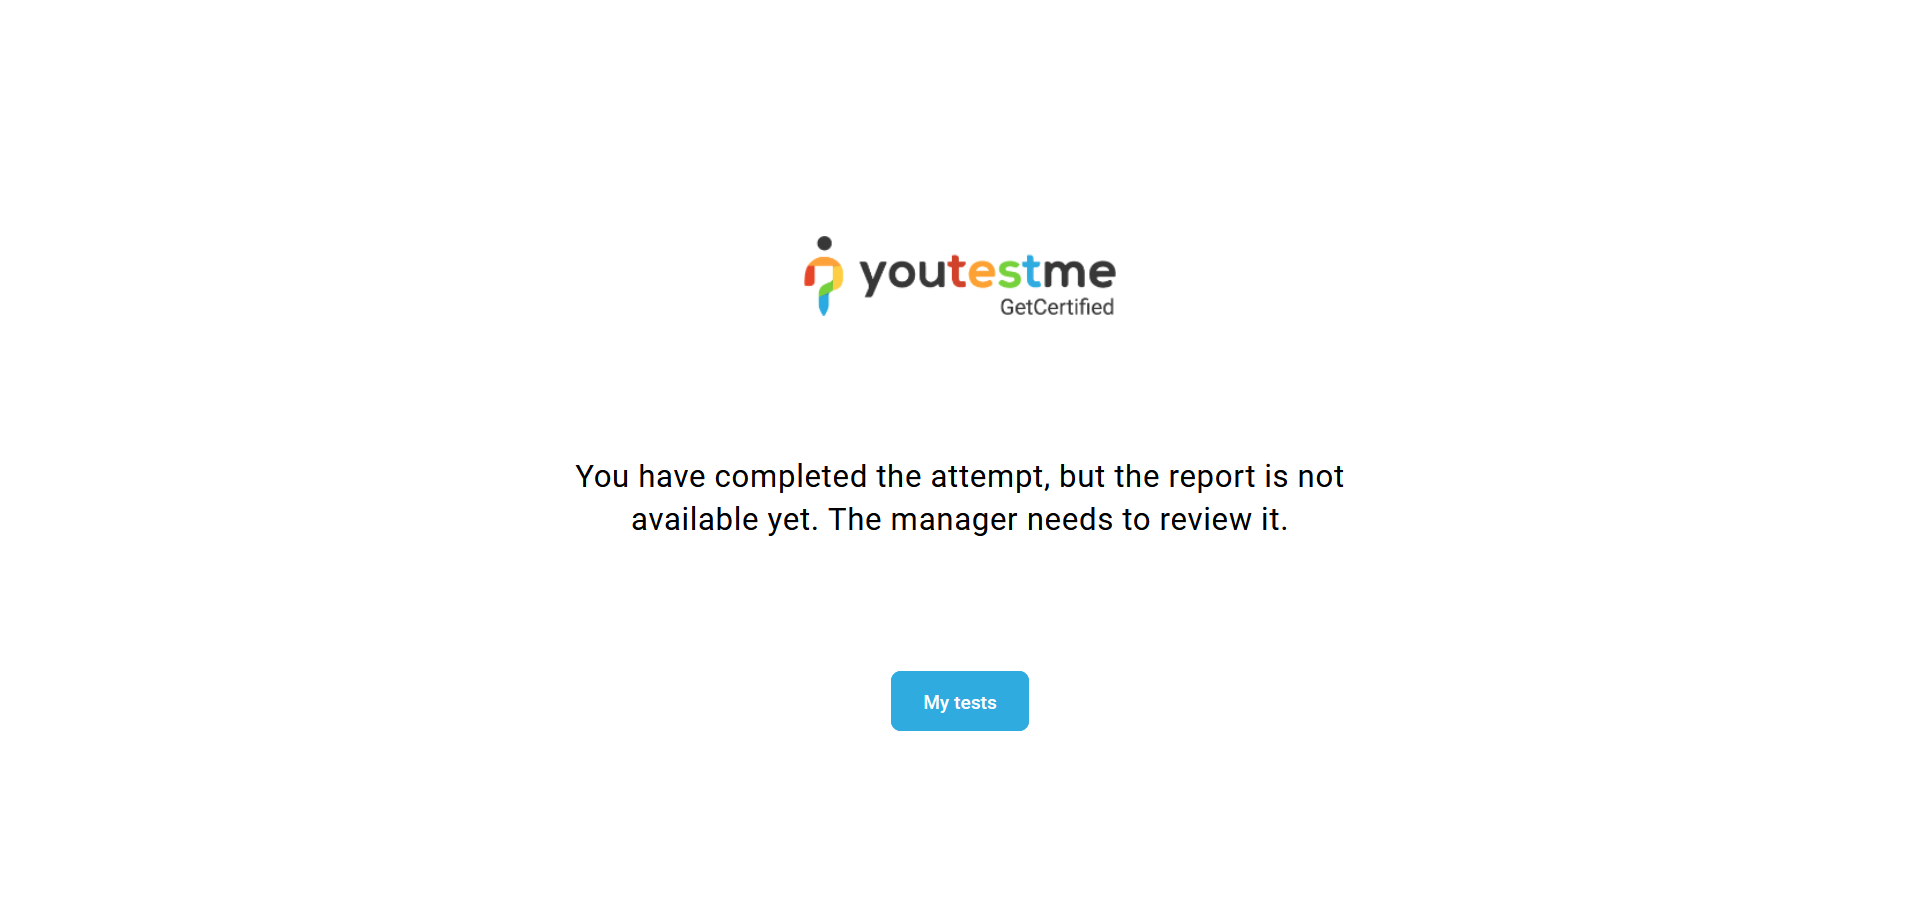
Note: If the Show report is set to On manager’s approval , the student will be redirected to the Sign out page with the following message.
Note: Click on this link to view an overview video of the test-taking process and the available question types.
Review your personal report

Note: As a student, you do not have permission to rate the questions.


