
Article verified for Release 15.2 on March 8, 2026
This article explains how to quickly and efficiently import questions into the question pool using a predefined YTM Excel format. You can bulk import questions with images (using a ZIP file) and without images.
You can add hundreds of thousands of questions to your Excel template and configure the settings of each question.
Bulk import questions using an Excel file
To download the import template, follow these steps:
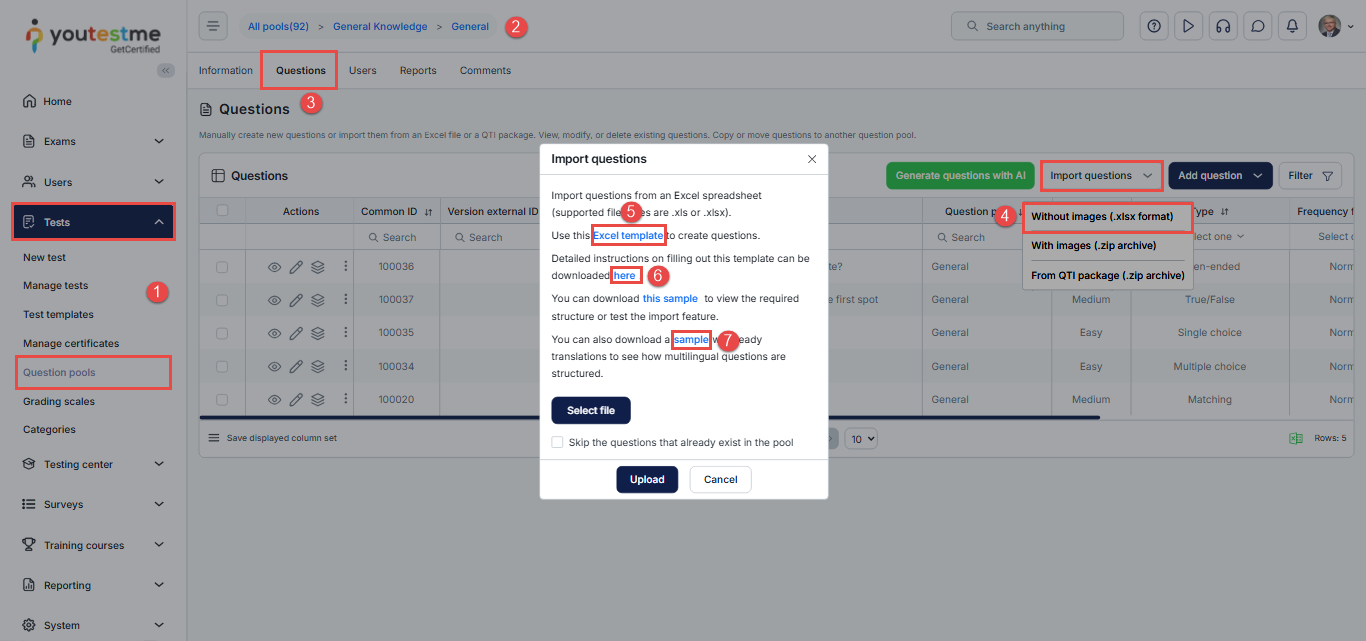
- Navigate to Tests > Question Pools.
- Select the desired pool.
- Go to the Questions tab.
- Click on Import Questions > Without Images (.xlsx format).
- Select the Excel template to download it.
- Check the Instructions on how to fill in the template properly.
- Download the Sample file to view the required structure. You can also import it into the pool to test the format.
Filling in the Excel template
The Excel template consists of two mandatory sheets containing fields where question properties should be entered.
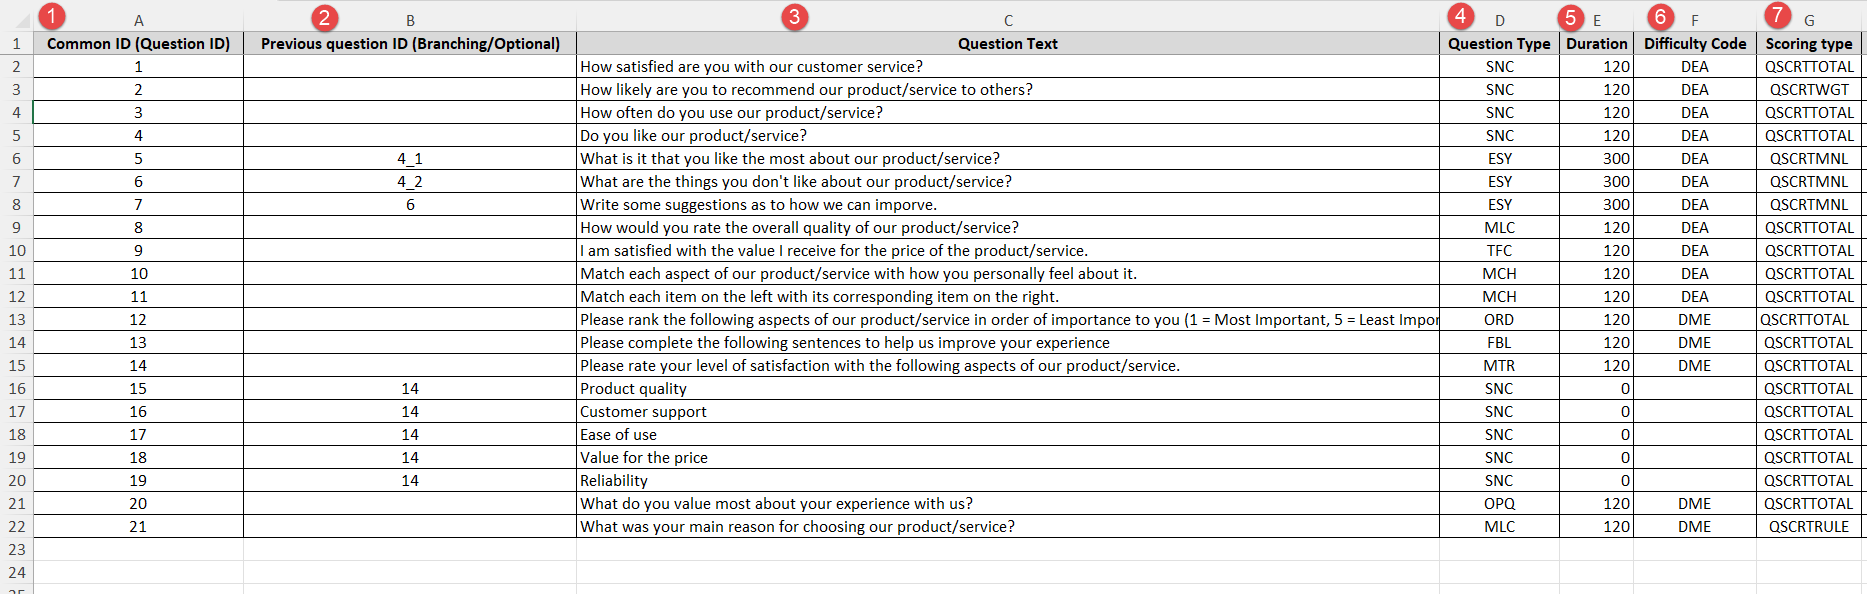
“Questions” sheet of the Excel template
On the first sheet related to question properties, the following fields are required: Question ID, Question Text, Question Type, Duration, Difficulty Code, Scoring type, Points, Frequency Factor, and Penalty. On the same sheet, the following fields are optional: Previous question ID, Subpool ID, External ID, Data Source, Tags, Categories, Feedback, and Custom Column Fields.
To properly fill these fields, refer to the following instructions.
- Insert the Common ID (Question ID).
- Optionally, insert the Branching question. It is imported like any other question. A follow-up question in a branch should reference the previous question’s ID and the number of the answer that led to it, separated by an underscore (e.g., 4_1).
- Insert the Question Text.
- Insert the Question Type. Supported question types are: Single Choice, Multiple Choice, True/False, Essay, Ordering, Fill in the Blanks, Open Question, Matrix, and Matching question types.
Note: The Fill-in-the-Blanks question type supports only simple text input. Offered answers are not supported. - Insert the Duration (Duration is inserted in seconds). Note: All questions must havea duration when adding them to the pool. You can specify the duration to test later and override that.
- Insert the Difficulty Code.
- Insert the Scoring Type. You can choose between Correct/Incorrect, Answer Weight, Manual grading, and By grading rules scoring types. To use the Grading by Rules scoring method, note that it requires a specific configuration. This configuration should be entered in the Grading Rules column. More details are provided later in the section that explains this column.
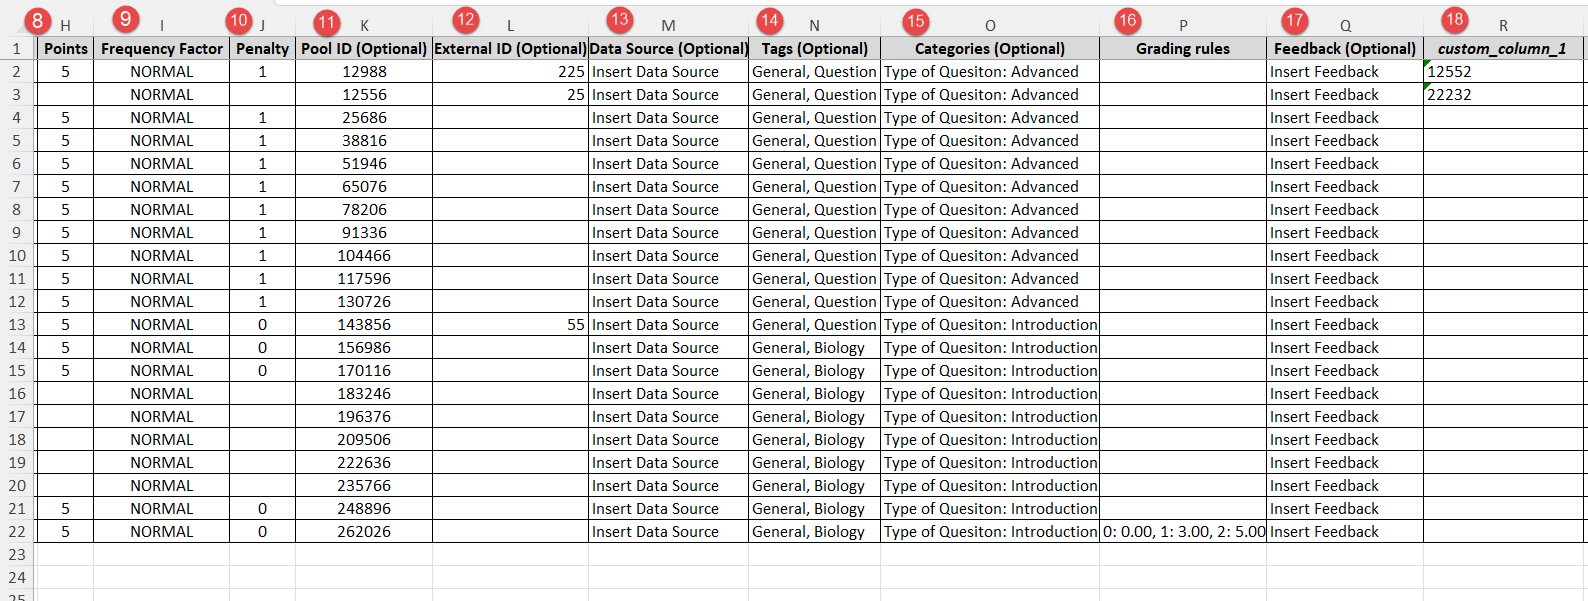
- Insert the number of Points you wish to assign to the question.
- Set the Frequency Factor based on how often you want each question to appear in the generated test.
- Insert the Penalty Points.
- Optionally, insert the Pool ID. By including a Subpool ID, the question will be assigned to a Subpool with that specific ID. If left empty, questions will be imported into the current pool.
- Optionally insert a unique External ID.
- Optionally insert Data Source – External system from which the question is imported.
- Optionally, insert a Question Tags. To add a question tag, simply insert text inside this column. If you wish to add multiple tags, separate them by comma.
- Optionally, insert Categories. The preconditions of importing questions with categories are that the categories must be created in
the system settings. After creating a Category, type the name of the category inside the column, and assign the value of the category by adding double dots and the text of the value (e.g., Type of Question: Introduction). To add multiple categories, divide them by using a semicolon(e.g., Type of Question: Introduction; Subject: Biology). To learn how to create a new Question Category, refer to this article. Important: When adding categories, do not use any special characters such as less-than<or greater-than>signs, or other symbols. Use only as shown in the examples. -
If the ‘By grading rule’ scoring method is selected, you must define the grading rule in this column using the format:
number_of_correct_answers:pointsFor example:
0:0.00, 1:3.00, 3:5.00means:-
0 correct answers → 0 points
-
1 correct answer → 3 points
-
3 correct answers → 5 points
Use commas to separate each rule, and do not include any extra spaces or unsupported characters. Leave the Points cell empty for this scoring type, because the maximum number of points will be assigned as the maximum question points. In this example, that will be 5 points.
-
- Optionally, add Feedback to a question by adding it as text according to your preferences.
- Optionally, insert a Custom Column. To insert the data inside the custom columns, you will first need to have an existing Custom Question Property. To learn how to create a custom question property, refer to this article. After creating a Custom Question Property, find the column assigned for your preferred question property and insert the text of the value you wish your property to have. If your question property has a dropdown type, find a
“Answers” sheet of the Excel Template
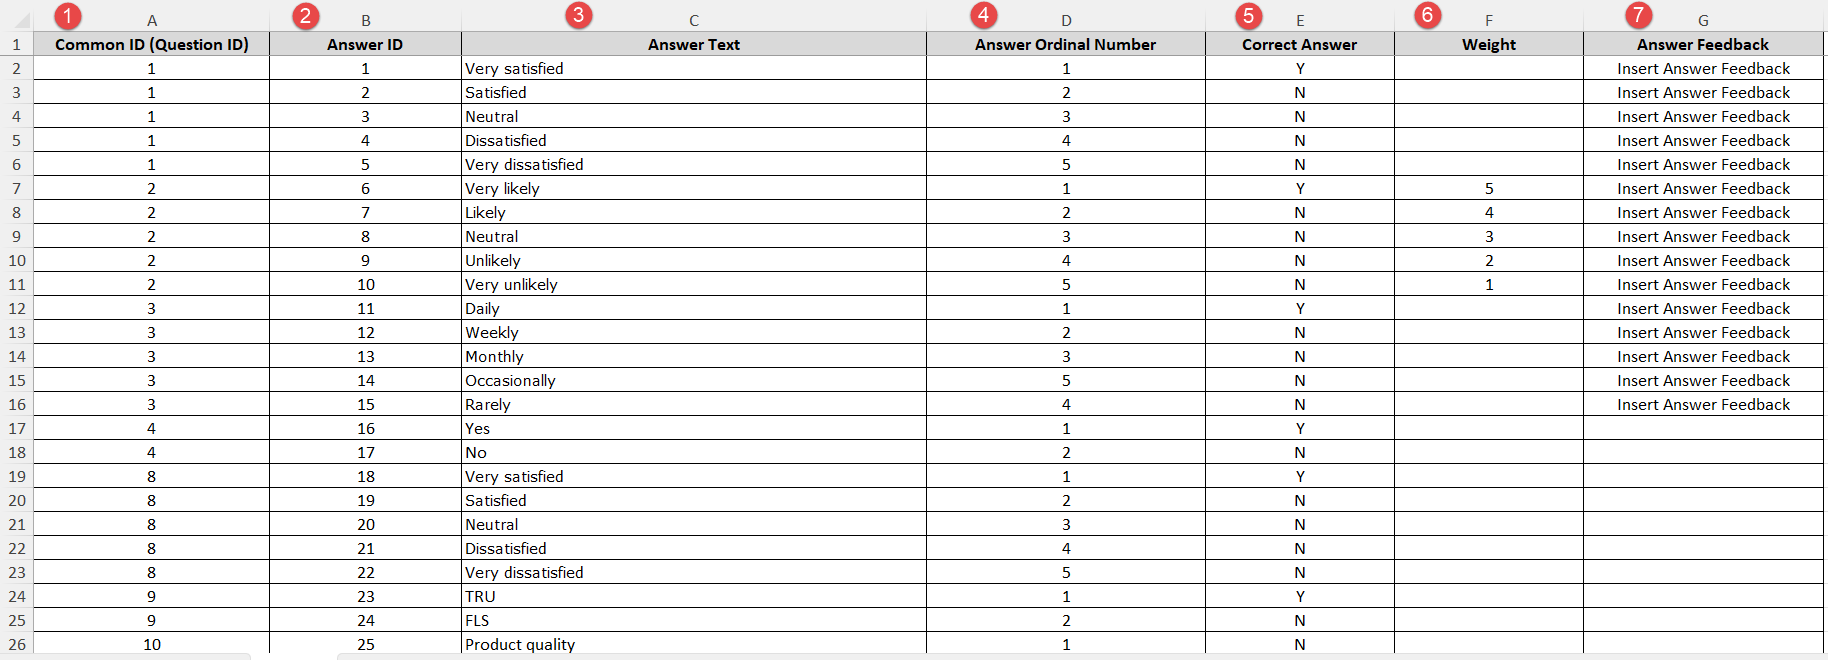
The second mandatory sheet of the Excel template is the “Answers” sheet. This sheet serves as a connection between questions and their correct answers.
- Insert the Common ID (Question ID) to which the answer is referring.
- Insert the Answer Text.
- Insert the Answer ID. This ID is required when importing question translations. For detailed instructions on importing questions with translations, see this article.
- Insert the Answer Ordinal Number.
- Insert the Correct Answer. The correct answer is inserted by typing “Y’ if the answer is correct or “N” if the answer is No.
- Optionally, insert the Weight. By inserting the weight, each of the answers will have a worth corresponding to the inserted number. This can only be applied to the questions that have Scoring Type selected as Score by Weight.
- Optionally, insert the Answer Feedback by inputting the preferred feedback text.
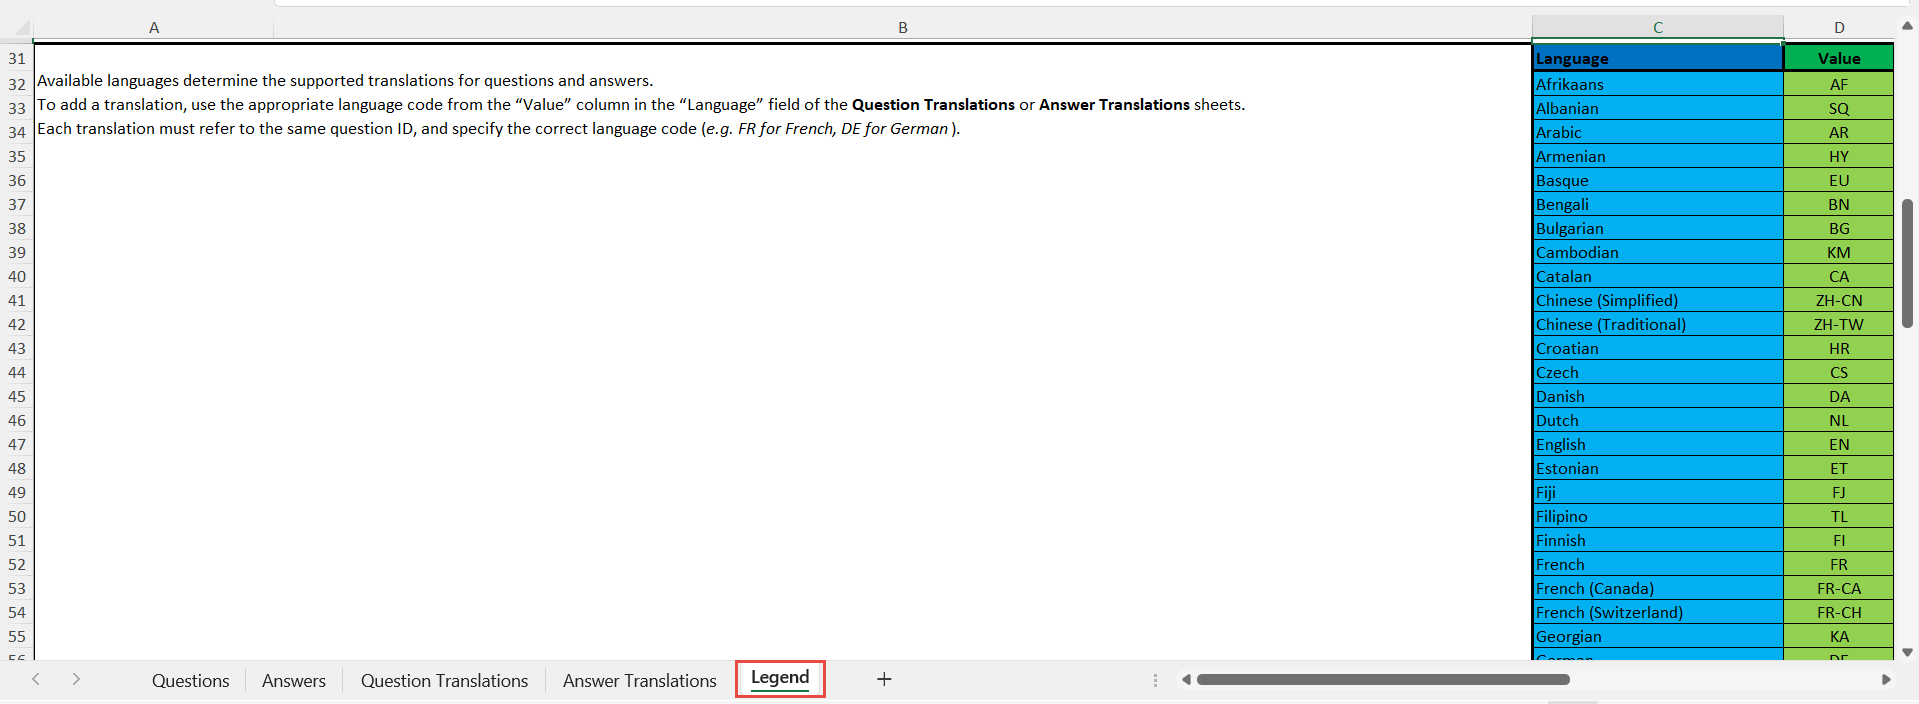
Note: In addition to the two main sheets used for question import, the Excel template includes two optional sheets dedicated to entering translations. These sheets allow you to provide translated content for questions and answers in multiple languages.
For detailed instructions on how to use these sheets to add translations, please refer to this article.
Legend
The Excel template has an additional sheet that showcases the Legend. This sheet serves to closely explain the codes that are assigned to certain Question Values.
- Question ID represents a unique number that identifies the questions. (Step of filling out the “Questions” sheet)
- Question type represents the question types supported by the application. You can see the Code related to each of the supported question types inside this table. (Step 4 of filling out the “Questions” sheet)
- Difficulties represent the difficulty of each question. You can see the Code related to each of the supported difficulties inside this table. (Step 5 of filling the “Questions” sheet)
- The Correct Answer codes vary depending on the question type. In the Single Choice, Multiple Choice, and True/False types, this field designates the correct answer. In the Matching question type, this field marks whether the provided answer is on the left or right side. We use Y and N to symbolize columns. Letter ‘N’ is for the left. You can place statements left or right as you wish. An ordinal number explains connections between statements. With the Fill in the Blanks and Ordering question types, this field has no function, but still is required to be filled in with the “N” value. Since the Essay question type does not require an answer field, the correct answer code is obsolete as well. (Step 4 of filling out the “Answers” sheet)
- The frequency factor shows the chance of a question appearing in the Generated Tests. (Step 9 of filling the “Questions” sheet)
- Scoring type determines how the points achieved on the question are calculated. (Step 7 of filling the “Questions” sheet)
 This sheet also includes guidelines and supported values for specific fields such as language codes.
Bulk import questions with images using a .zip file
YouTestMe provides an additional option to import questions with images using a .zip file. To learn more about how to import questions with images using an Excel Template and .zip file, visit this article.
