Introduction #
This article will introduce you to the Record&Review process, where the system records the candidate during the whole test-taking process by flagging suspicious parts of the recording.
Once the exam is completed, a human proctor reviews the recorded video within a maximum of 12 hours after the exam is finished. The proctor will rate and provide a report for each student based on their behavior during the exam.
The primary advantage of the Record&Review process is that students can take exams at any time rather than being limited to pre-scheduled exam times set by the test organizer.
Accessing the recordings #
After a candidate completes their exam, the application stores their ID, a recording of their surroundings, and a recording of their exam, including both the candidate and the screen sharing.
This information is securely stored and can only be accessed by authorized personnel – proctor.
To ensure that recordings are reviewed in a timely manner, the system sends email notifications to the proctor on an hourly basis with a list of completed attempts that need to be reviewed. This ensures that candidates receive their results promptly, and any issues or violations during the exam can be addressed promptly.
Accessing the recordings is a straightforward process for the proctor. They simply need to do the following:
- Select the Tests/Manage tests tab in the left-side menu.
- Select the desired test.
- Select the Monitoring tab.
- To review the recording click on the Proctoring report option. This will take you to the recording view where you can review the video footage of the test-taker.
Rules for reviewing the recording #
The proctor must check three key aspects of the recording to ensure that the assessment process is fair, transparent, and reliable.
Firstly, the proctor must verify the student’s ID and ensure that the candidate who completed the exam is the same person who registered for it. This is important to prevent any identity fraud or impersonation during the exam.
To check the ID student initially uploaded, select the name of the test and choose the tab Parameters.
Secondly, the proctor must review the recording of the candidate’s surroundings to ensure that there are no unauthorized materials or persons present. This helps to prevent cheating during the exam and ensures that the assessment process is conducted under fair conditions.
To see the candidate’s surroundings, click on the test name and select the Overview tab.
Finally, the proctor must review the video of the candidate taking the exam to ensure that there are no violations or suspicious behavior during the exam. This includes checking for any unauthorized screen sharing, the opening of new tabs or windows, or other forms of cheating.
To review the recording, proctor should:
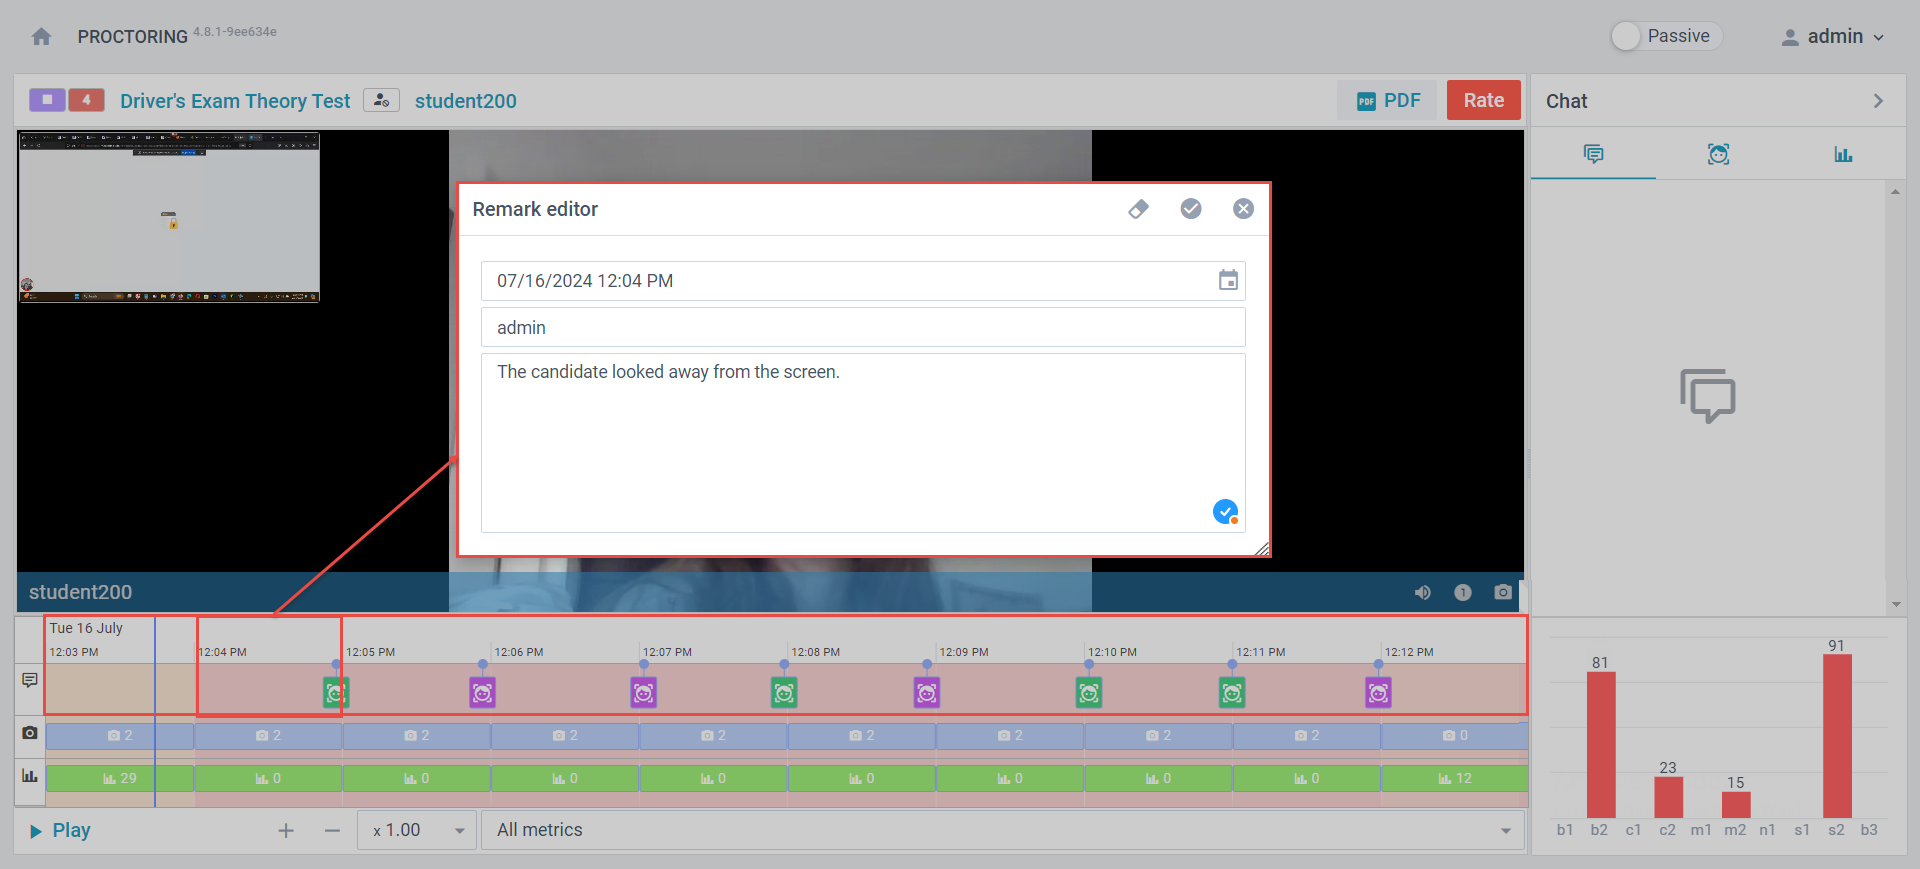
- Check all spots marked red – those spots the system detected as suspicious. These may include instances where the test-taker looked away from the screen, covered their face, or had someone else in the room.
- Speed up the video and go through it all, just in case. This will help you identify any other suspicious behavior that may have been missed.
By checking these three key aspects, the proctor can ensure that the assessment process is conducted fairly, transparently, and reliably. The Record&Review process provides an efficient and secure way of administering exams, enabling educational institutions to maintain the integrity of the assessment process even in remote, unsupervised testing environments.
Writing a Proctoring Report #
After reviewing the recording, the proctor should resolve all proctoring reports by rating them and entering a comment for each one of them.
To grade a proctoring report, follow these steps:
- Navigate back to the Monitoring tab.
- Click on the Proctoring report option.
- Select the Rate option.
- The Proctoring report dialog will appear. Rate the report Positive (0 violations), Negative (if there were violations and incident messages), or Neutral (if there is any incident message).

Note: You can also assign a specific behavior for a particular time frame. Right-click on the specific time where the candidate committed a violation. A pop-up dialog will appear, allowing the proctor to add comments.
Conclusion #
This method of administering exams is becoming increasingly popular, particularly in the current climate of remote learning and online education. With the Record&Review process, educational institutions can ensure that the assessment process is fair, transparent, and reliable, even when proctors are not present during the exam.


