Article verified for Release 14.2 on June 27, 2025.
This article explains how to create a test with sections in the YTM system. It provides a step-by-step guide to help you design a well-structured and effective test.
Test Creation
To create a test with sections, please follow these instructions:
- Select the Tests/New Test tab.
- To create a test with sections, check the Test with sections option.
- Test wizard for tests with sections is divided into seven steps: Information, Settings, Sections, Grading, Certificates, Review, Testing sessions, and Save test. Below, you will discover more details about each of these steps.

Step 1: Information
These steps are identical to those outlined in How to Create a Simple Test. However, an additional option becomes available in the advanced settings if the test includes sections.
The Enable Section Selection feature allows test managers to assign specific sections to candidates based on predefined conditions. If conditions are set for sections, candidates will only have access to the sections they qualify for when they start or book the test.

Step 2: Settings
In this step, the following options are available:
- Duration type:
- Time defined in each section – Test duration is determined by summing the durations of all sections based on their assigned duration type. For more details, please refer to the following article on How to define the test duration Settings.
- Time per test – Test-takers are given a predefined total duration to complete all sections and can allocate their time to sections as they see fit.
- Score report and Report content – Choose when to show the report to candidates and whether to include only the score or both the score and answer details.
- Proctoring settings – If enabled, a specialized proctoring tool will be used to prevent cheating on the test. For more details, please visit this article on How to create a proctored test.
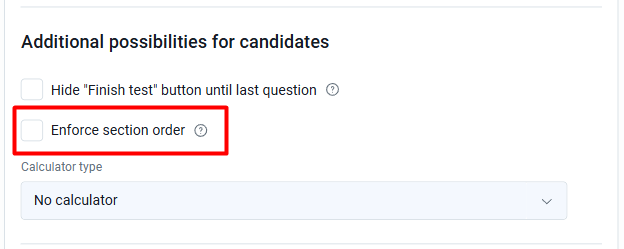
- Display advanced settings – The options are identical to How to Create a Simple Test. However, an additional option, Enforce Section Order, is available if the test includes sections.

Option: Enforce Section Order
Candidates must complete sections in sequence, starting from the first and proceeding in order.
Step 3: Sections
Click Add Section to create a new section. You can add as many sections as needed to organize your test effectively. Each section has its own settings, similar to the test settings, allowing for customized configurations.

Section creation
Step 1: Section information
In this step, you can:
- Enter the Name of the test.
- Enter an optional test description to provide additional details about the test.
- In the advanced settings, you can add attachments to the test. For more details, please refer to the How to Create a Test with Attachments article.

Step 2: Settings
In this step, you can:
- Test template – When creating a test, you can save its settings and question pool configuration as templates. You can use one of the previously created test templates by choosing it from the drop-down menu, and all saved test configurations will be automatically applied. For more information, please visit Test templates.
- Duration type – Choose how you want to time-limit your test by selecting the duration type:
- Unlimited – the test will not be time-limited.
- Time per question – each question in the test will have its time limit. The exact time limit for each question can be configured during the question creation process.
- Time to answer all questions – set the time limit for the whole test.
- Page format – set how the questions will be displayed, whether you want to display each question on a separate page or display all questions at once. You can choose between:
- One question per page
- All questions on one page
Note: If the test contains branching questions, the option All questions on one page is automatically disabled. This option is recommended for tests up to 20 questions.

The advanced settings have the following fields:
- Enter the test instructions, which are specific rules or guidelines that students must acknowledge, in a pop-up dialog before starting the test. These instructions can be accessed under the instructions icon during the test-taking process and may cover details such as breaks, calculator usage, permitted learning materials, and other relevant information.
- Enable “I don’t know” option – test-takers will be able to check the I don’t know box when answering the question to avoid negative points.
- Enable answer feedback – This option enables feedback for the selected answers during the test-taking process, which will be displayed upon moving on to the next question. Feedback should be defined during the question creation process.
- Show question attachments – Show question attachments to candidates during the test-taking process.
- Show question metadata to candidate – test-takers will be shown question points, type, and difficulty level during the test-taking.
- Enable Notes: Allow test-takers to take notes within each section using a text editor for formatted text. Notes are only visible to the candidate during the test. This option must be enabled for each section individually. If a section contains attachments, test-takers can open an attachment as a note and write beneath it using the Open this attachment as note option.
- Enable candidates’ feedback on questions – Allow candidates to leave feedback on each question during the test-taking process.
- Enable unanswered questions message – Upon selecting the Finish button, the candidate will be provided with a notification detailing their unanswered questions.
- Require answering all questions – If you choose this option, candidates will be notified that they are required to answer all questions before finishing the test.
- Disable going backward in the test – test-takers cannot go back to the previous questions while taking the test if you check this option.
- Disable deselect – do not allow the test-takers to deselect their answers once selected. This applies to the single-choice, multiple-choice, and true/false questions.
- Enable revisiting section – Candidates can switch between sections until they submit their answers for each section by clicking the ‘Finish section’ button.
- Automatically logout candidate after finishing – the candidates will be required to log out of the application after test completion.

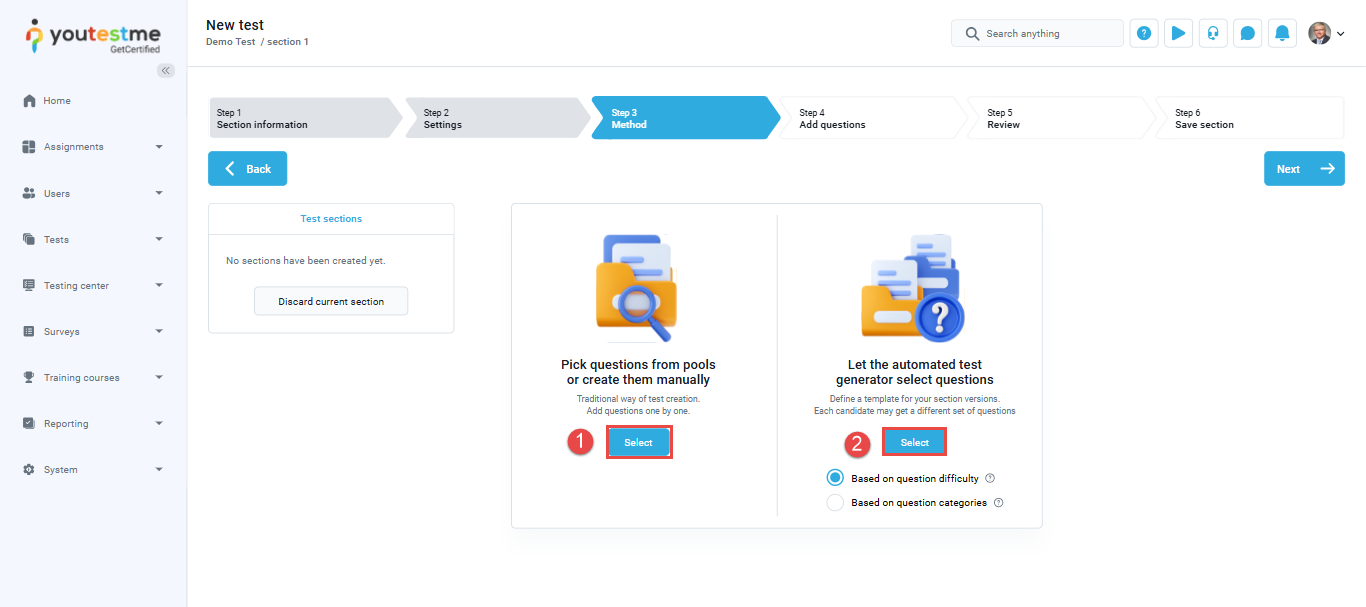
Steps 3-4: Method/Add questions
In this step, you can choose between the following methods for adding questions to the section:
- Pick questions from pools or create them on the spot – For detailed instructions on creating and adding questions to a test, please visit this article.
- Let the generator select questions based on question difficulty or question categories – For more information about how to create a generated test, please view this article.
Step 5: Generator
In this step, you can define the test versions and question settings:
Note: This step will only appear if you choose to allow the generator to select questions automatically.
- Specify the allocation of points and penalties for each question based on its difficulty level.
- Generate test versions dynamically or specify the number of unique versions – Enabling this option allows the system to create a new version each time a candidate begins the test.
- Practice test – Enabling this option permits candidates to select the desired number of questions from each question pool that the test will contain.

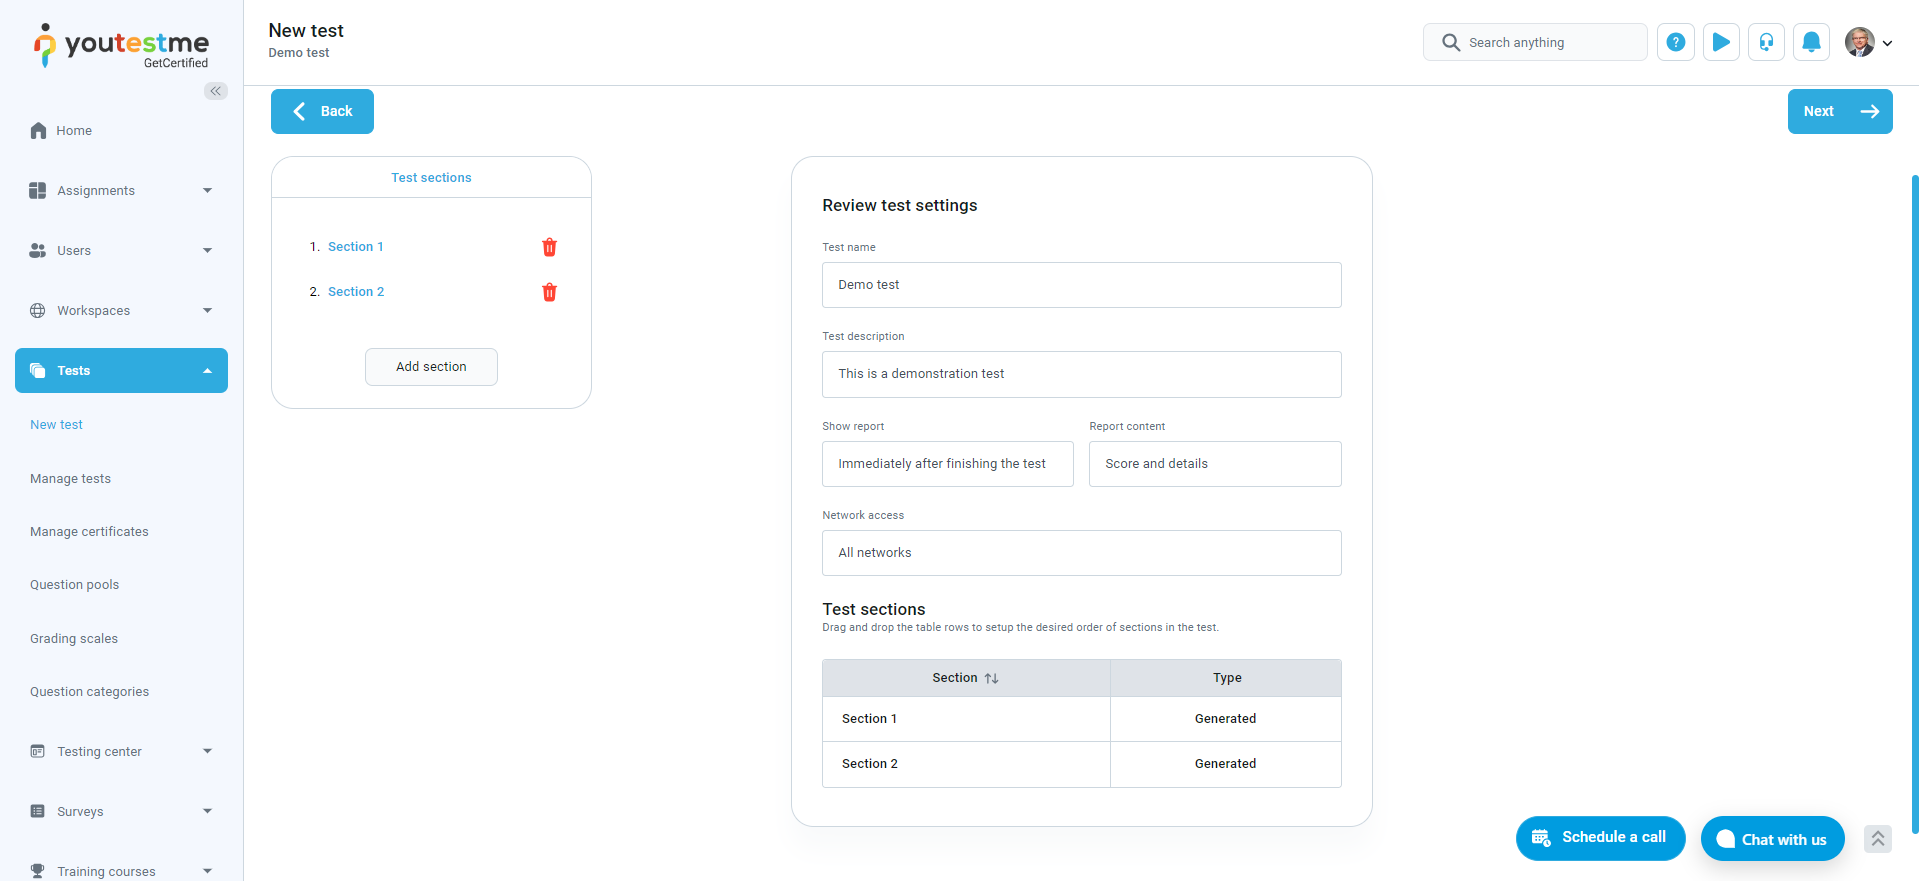
Step 6: Review
In this step, you can review the specified section settings. If you wish to make edits, you can utilize the Back button or proceed to the final step using the Next button.

Step 7: Save sections
In this step, you can:
- Save the created section settings and proceed to finalize the test creation using the Save and Continue button.
- Save the created section settings and include a new section using the Add another section button.
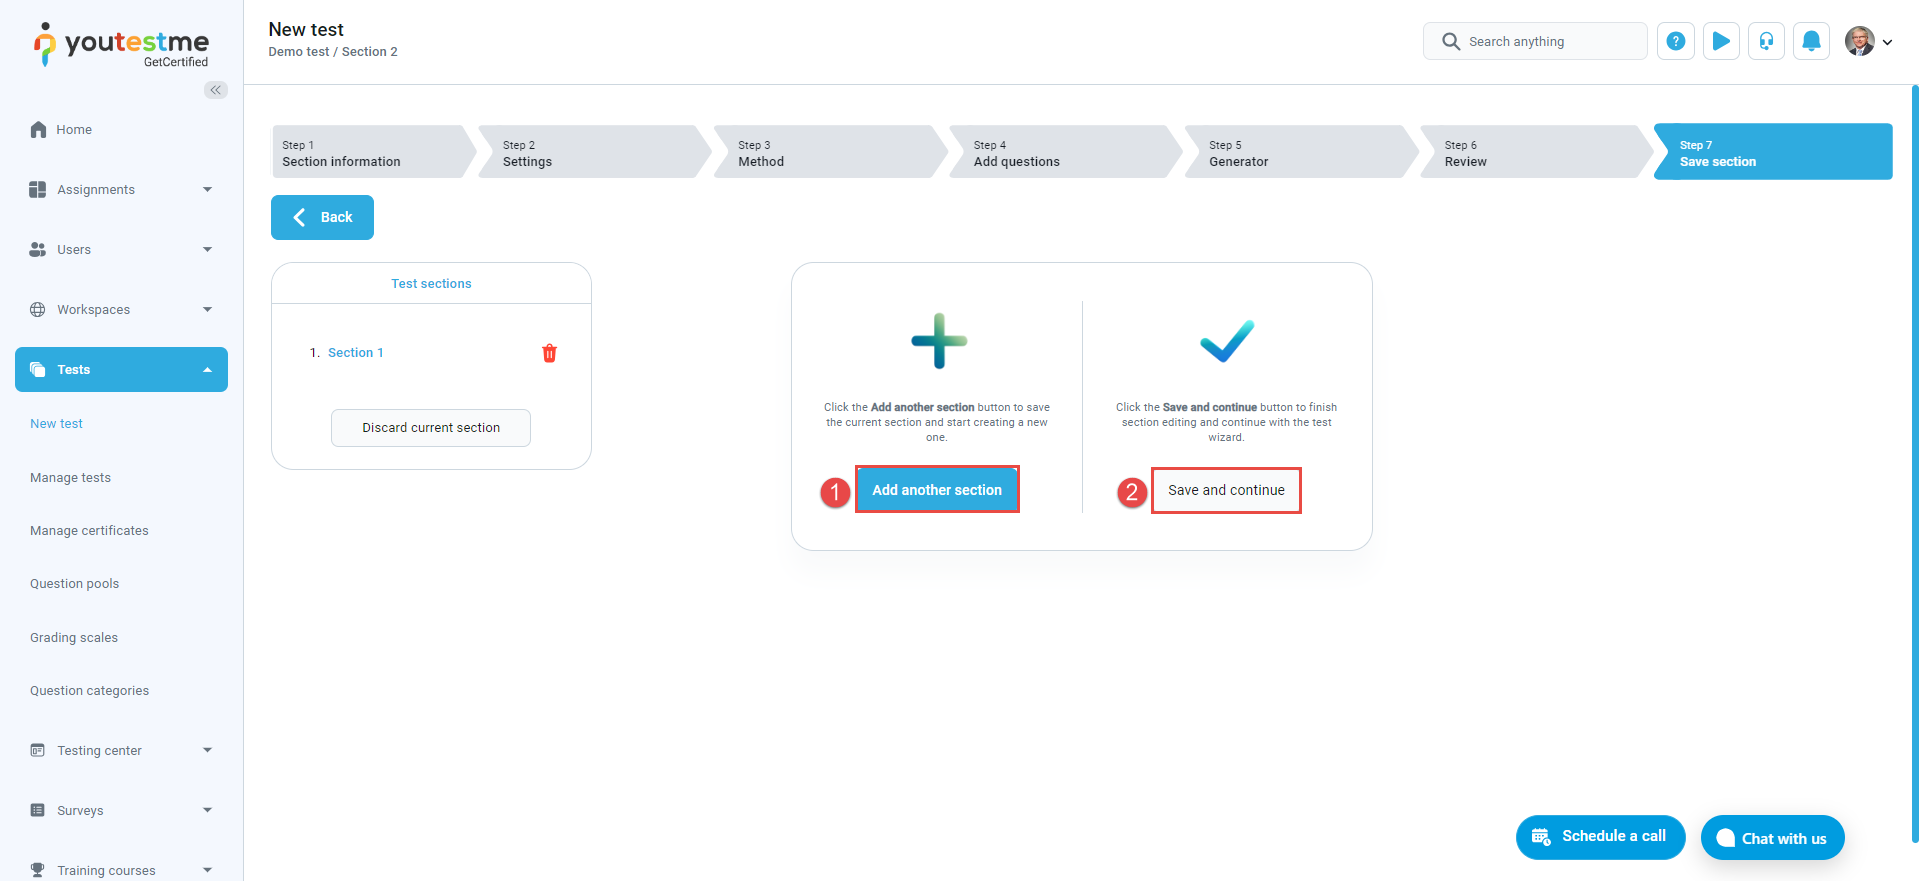
Once you’ve finished adding sections to the test, you will be redirected to Step 4 of the test creation wizard to finalize the test settings.
Step 4: Grading
Here are the actions you can take at this step:
- Define Passing Mark for the Test: Select the passing mark type, either percentage or points and specify the minimum required score to pass.
- Make the Passing Mark Inclusive: Enabling this option allows candidates to pass the test only by achieving an equal passing mark.
- Proctoring Report: If the test is proctored, enabling this option ensures candidates cannot pass the exam solely by obtaining a positive proctoring grade. Otherwise, the proctoring report won’t affect the final score.
- Show Advanced Settings: In the advanced settings, you’ll have the following options:
- Map Score to a Grading Scale: Associate specific grades with achieved points or percentages by selecting a previously created grading scale. This mapping helps represent test results as grades (e.g., A to F).
- Section Groups: Group test sections, set passing mark criteria, or modify passing mark settings.
- Question Attributes Reports: Use descriptive passing marks to indicate an expected level of knowledge in specific subject areas. Questions are drawn from the displayed question pools.
- Question Property Reports: Define passing marks based on custom properties assigned to questions. Create dropdown custom question properties within the application and label questions using these values. Optionally, set passing criteria for the test based on these custom values.

Additionally, from the advanced settings, you can define passing criteria for each section:
- Edit Passing Mark: Click the pencil icon to edit the passing mark.
- Section Requirement: Specify if passing the section is mandatory to pass the entire test.
- Set Passing Marks: Choose the required passing score for each section.
- Inclusive Mark Option: Enable this to allow candidates to pass if their score is equal to or higher than the passing mark.
- Grading Scale: Assign a grading scale you’ve created to represent section results as grades.
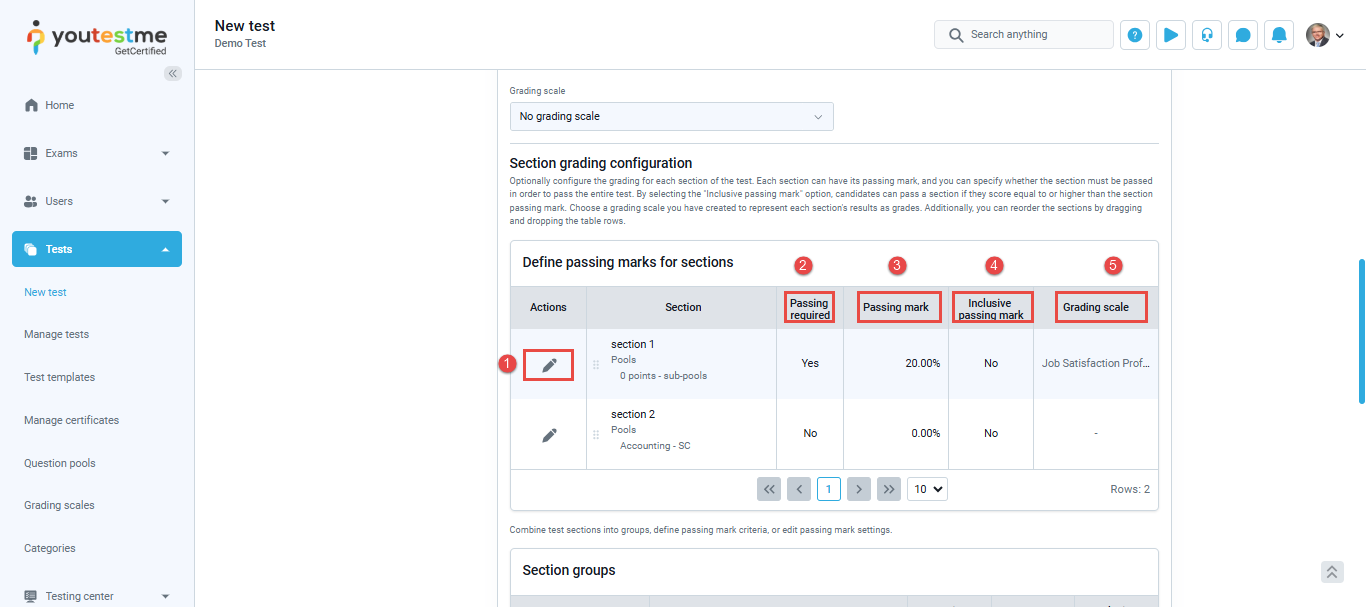
Note: you can reorder the sections by dragging and dropping the table rows.
Step 5: Certifications
In this step, you can add a test certificate by clicking the Add Certificate button. This is optional, and you can also add a certificate after the test is published through the test settings. For more details on assigning certificates, refer to the article, How to Create and Manage Certificates.

Step 6: Review
In this step, you can review the test settings. It contains a summary of the test settings and a list of sections. If you are satisfied with your test settings, press the Next button to continue the test creation process. If you want to change the test’s configuration, you can still go back and edit it.
Step 7: Testing sessions
In this step, you have the option to create testing sessions. The testing sessions allow you to organize tests for candidates located at different locations (e.g., different time zones, states, continents, etc.).
- Manually create a testing session – For step-by-step instructions, please refer to this article.
- Import testing sessions via Excel – Upload an Excel file to import multiple testing sessions and assign candidates to each session directly within the file. For detailed guidance, see the article.
- Skip this step – Since this step is optional, you can skip it and proceed to the final step.

Step 8: Save test
The final step in the test creation process is saving your test:
- Click Save and Publish to make the test available to candidates. If a testing session has already been created and configured accordingly, the test will immediately become visible.
- Click Save as Draft to save your test without publishing it. Even if testing sessions have been created, the test will remain hidden from candidates until it is published.

After completing the test creation, you will be redirected to the ‘Manage Tests‘ section, where you can publish the test, create testing sessions (if not already done during test creation), and assign candidates as needed.
For more details on how to create a testing session and assign candidates, please read this article: How to Schedule a Testing Session
After publishing the test, you can edit its settings, such as:
- Changing the test name.
- Adding a description.
- Exporting, archiving, or creating a copy of the test.
For more details, please visit this article.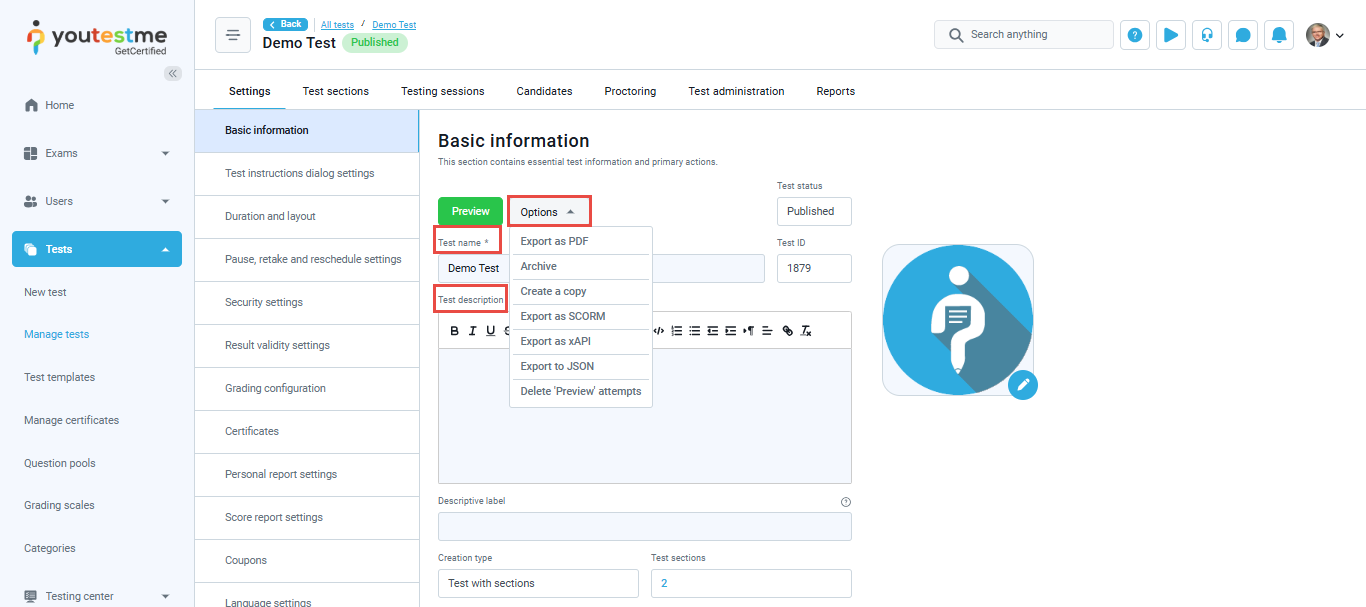
Candidate’s perspective
From the candidate’s perspective, the test will be organized into sections, which they can start and complete one by one.

Candidates can choose to finish a section or complete the entire exam.

After completing a section, the status will change from “Available” to “Completed.”
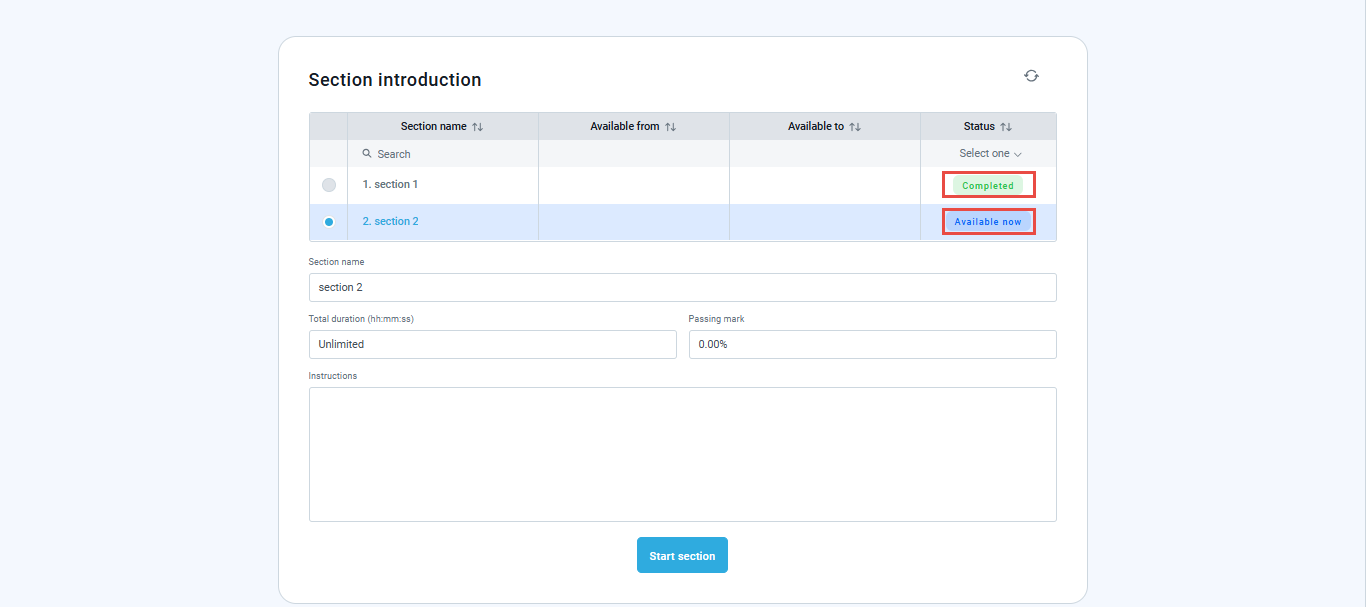
This structure allows candidates to progress at their own pace while keeping track of their completed sections.
After clicking the Finish Test button, candidates will be shown the number of questions they answered in each section.
Note: To hide this information from candidates, navigate to:
System > Settings and Customization > System Preferences > Additional Modules, and toggle off the option “Display answered questions per section on finish dialog.”

For more details on how to create a test with sections, please watch this video
For additional related topics, please refer to the following articles:
- How to Create Generated Tests with Method “By Answer Weight”
- How to Create, Take, and Monitor a Proctored Test
- How to Create Multiple Test Versions
- How to Enable Section Selection


